DeskewPro Documentation
Everything you need to crop, deskew, and dewarp scanned book PDFs on your Mac.
Getting Started
Opening a PDF or images
Use File > Open File... (Cmd+O) or click "Open File..." on the welcome screen. You can open a PDF, or open image files directly. DeskewPro supports every major image type scanners produce, including JPEG, PNG, TIFF, BMP, GIF, HEIC, WebP, and JPEG 2000. A multi-page TIFF expands into one page per frame.
You can select multiple files at once, and you can mix PDFs and images in the same selection. This combines them into a single project, which is useful for books scanned in two halves or as a folder of page images.
When you open multiple files, the Document Manager dialog appears so you can arrange the document order before loading. A "Sort by" control lets you order the documents by filename, date modified, or capture date in one step. You can still drag documents to fine-tune the order afterward.
Opening a folder of images. If your pages are saved as separate image files in a folder, choose File > Open Image Folder... and pick the folder. DeskewPro loads every supported image inside it as a project, ordered by filename. The order is natural, so page-2.jpg comes before page-10.jpg. The new project is named after the folder, and it opens directly without the Document Manager since the page order is already unambiguous. Hidden files and subfolders are skipped.
Drag and drop. You can also drag image files, a folder of images, or a PDF onto the app window. Dropping onto the welcome screen starts a new project. Dropping onto an open project adds the pages to it.
Projects
Every time you open a PDF, DeskewPro creates a project that stores all your crop settings, page order, rotations, and correction parameters. If you open the same PDF again later, DeskewPro finds the existing project and restores your settings automatically.
Projects are saved in the app's data directory. Your source PDFs are never modified. Use the "Projects..." button on the welcome screen to browse, open, or delete projects. Deleting a project removes only the saved settings, not your source files.
Recent Projects
The welcome screen shows recently opened projects. Click a project name to reopen it. Use the X button to remove an entry from the list, or "Clear All" to clear the entire list. This only affects the recent list; the projects themselves are not deleted.
Renaming a Project
Use File > Rename Project... to change the project name. Type a new name and click Rename (or press Return) to confirm. The new name appears in the window title bar, is saved to the project file, and updated in the recent projects list.
Interface Layout
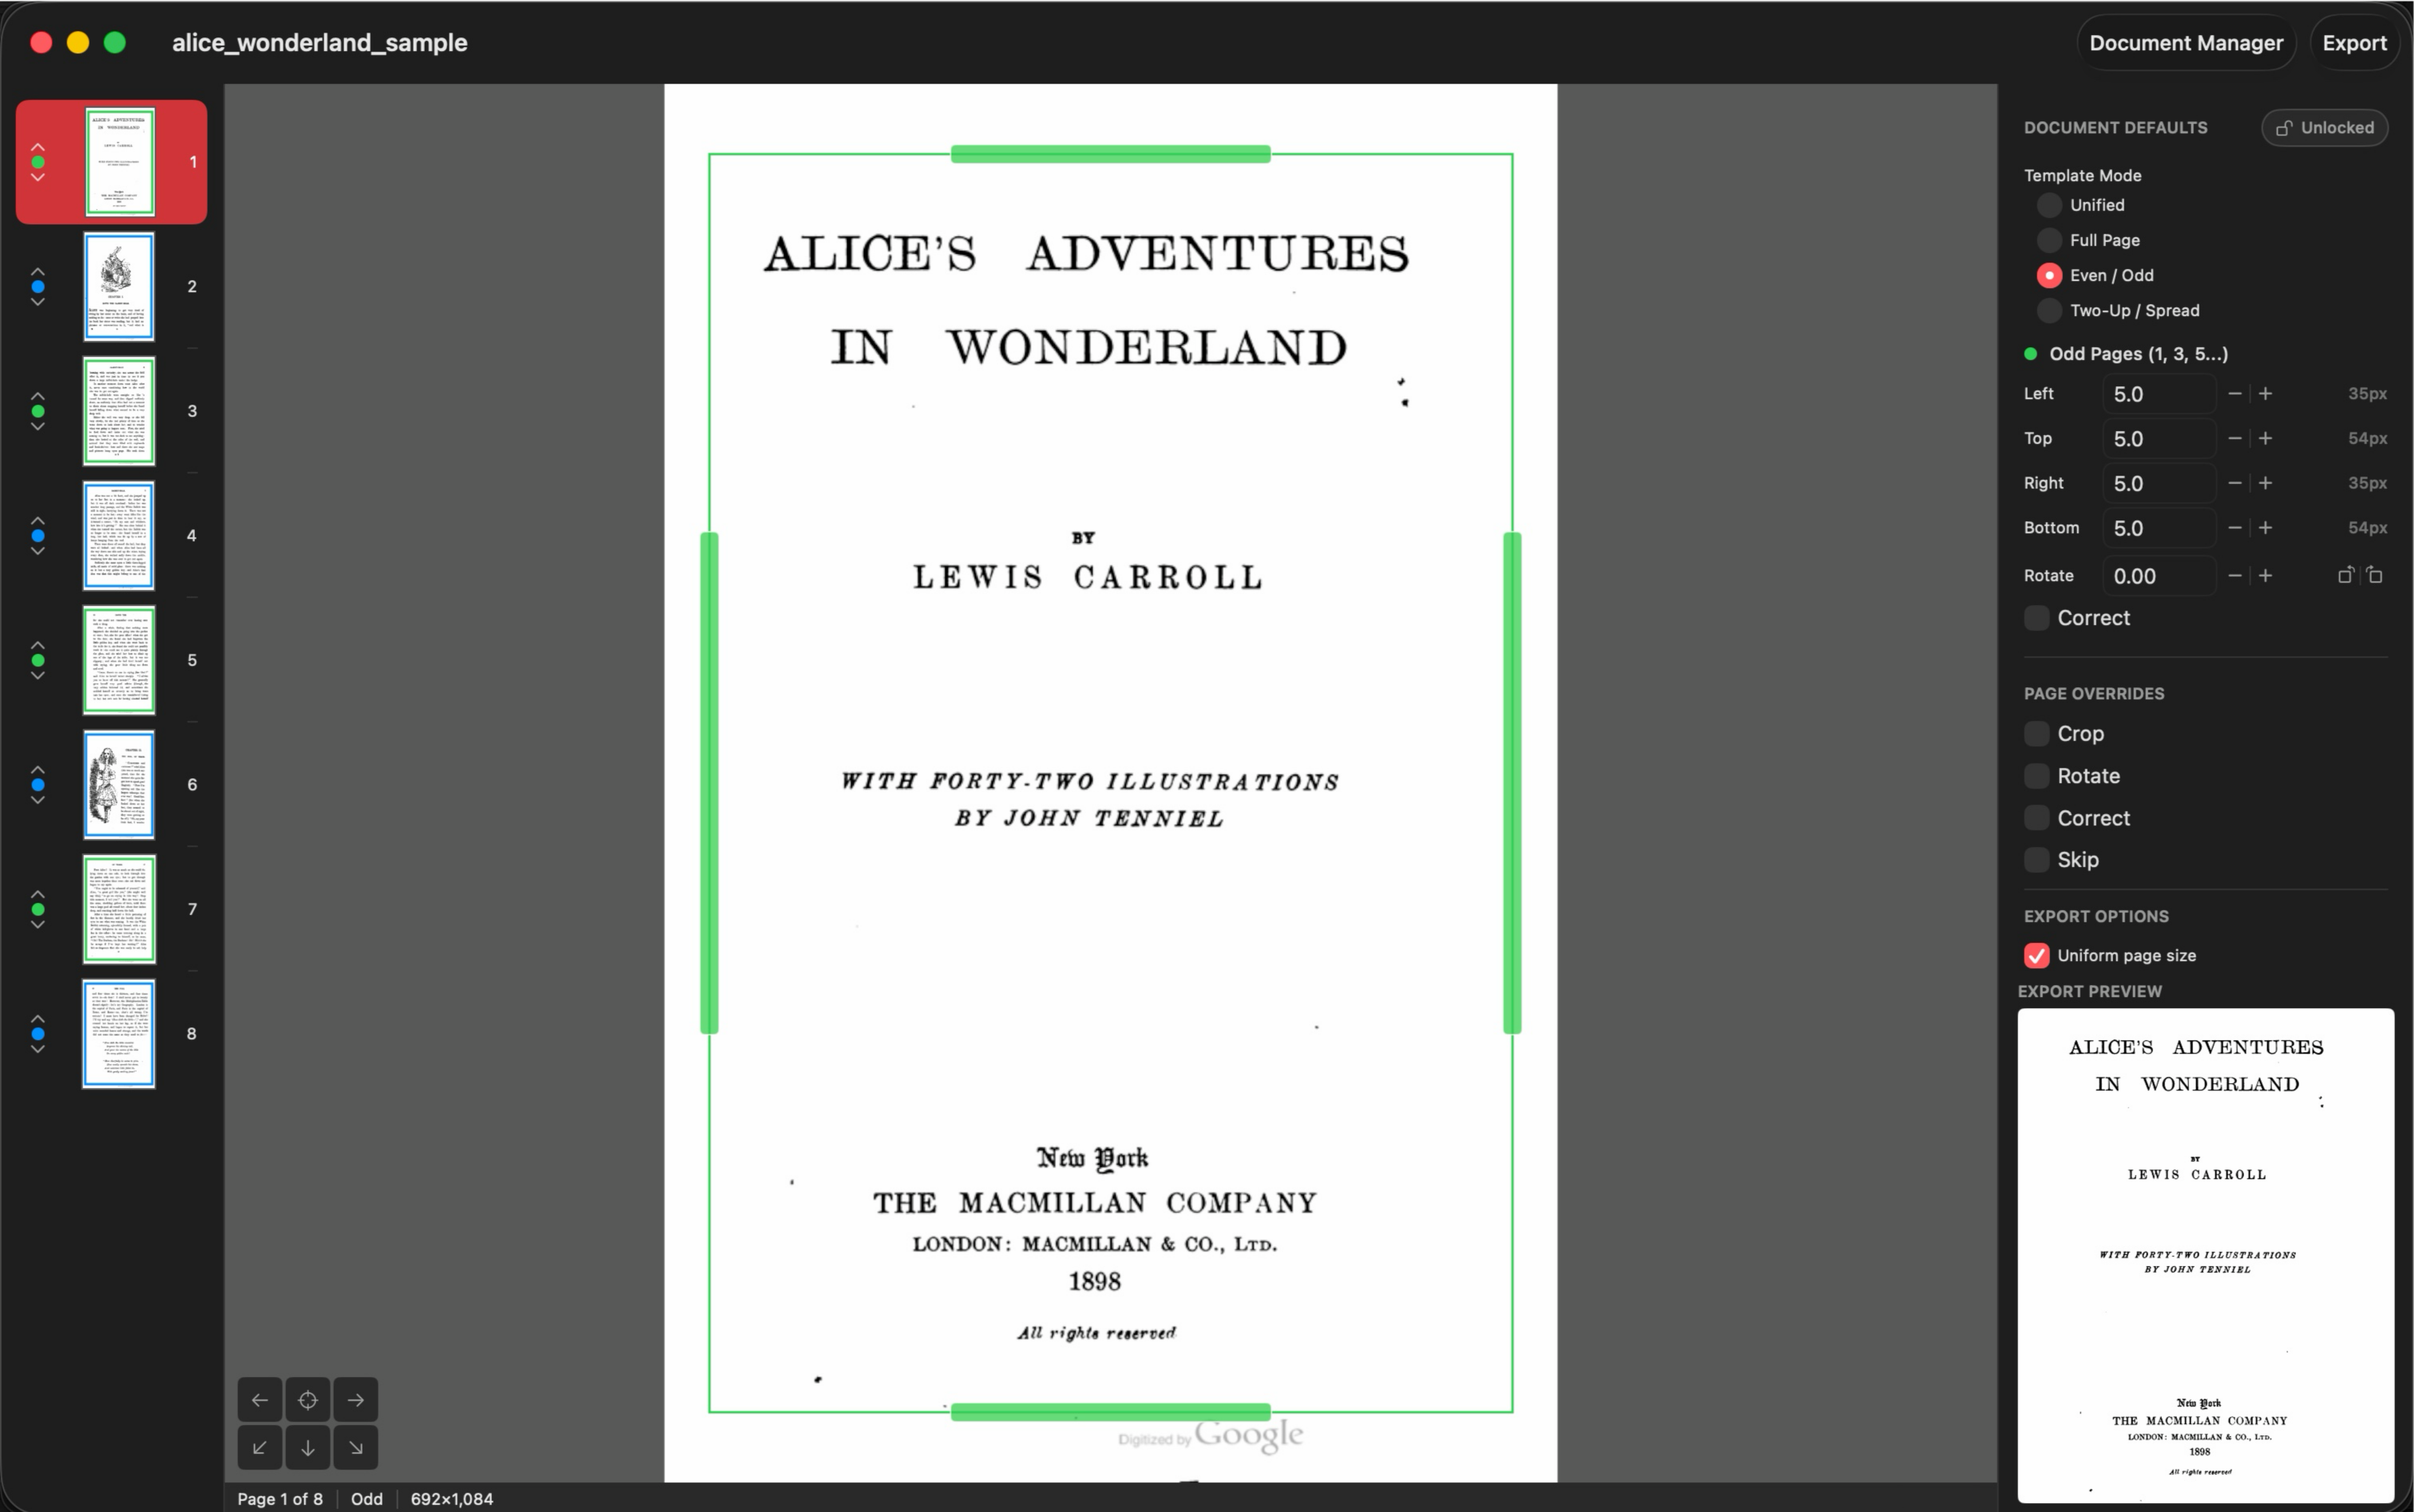
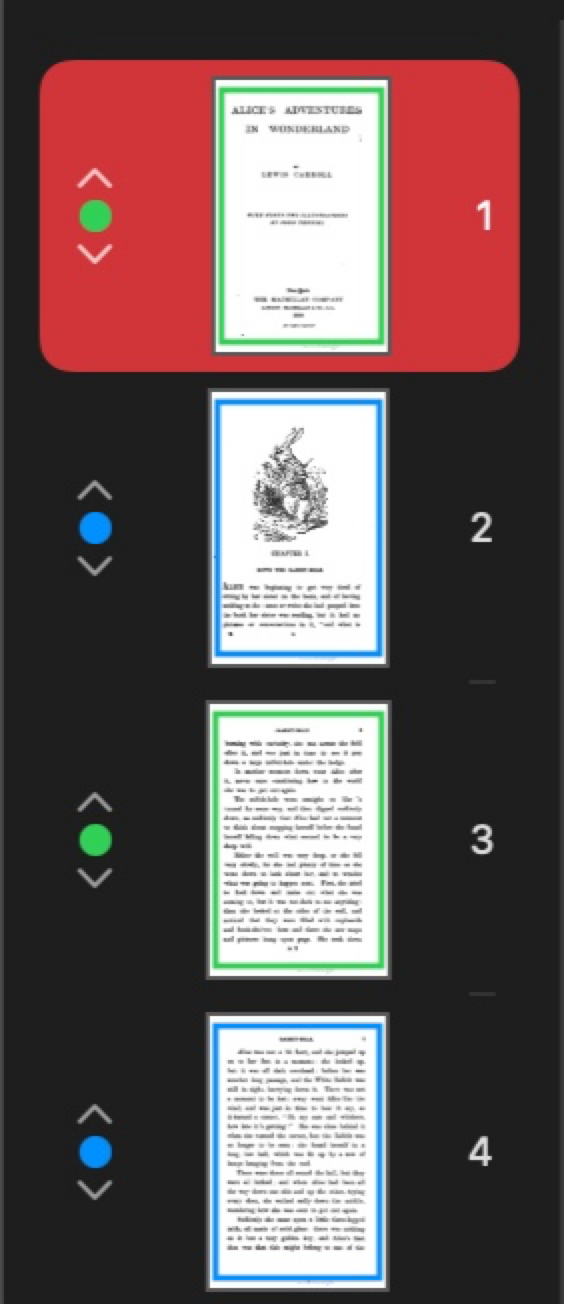
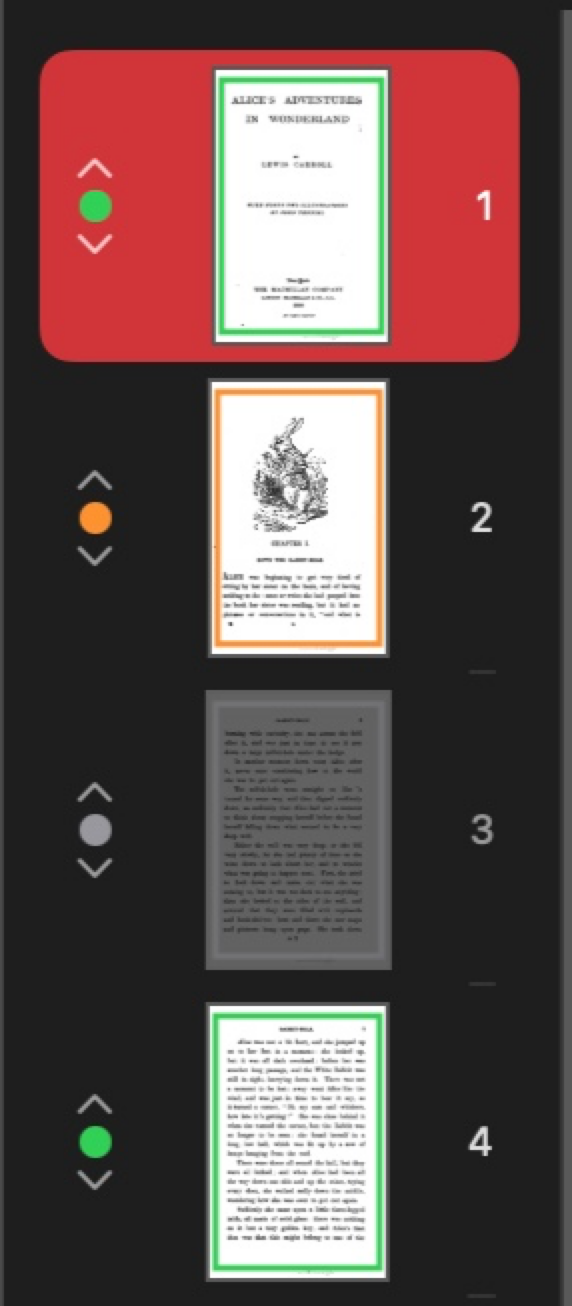
Sidebar (Page Thumbnails)
The left sidebar shows a scrollable list of page thumbnails. Each thumbnail displays a mini crop overlay and a colored dot indicating page type (see color coding below). The project page number appears at the top right of each row, and the original document page number appears at the bottom right in a color assigned to its source document.
Hover over the original page number to see the source document name. Click a thumbnail to navigate to that page. Drag and drop thumbnails to reorder pages.
Main Canvas
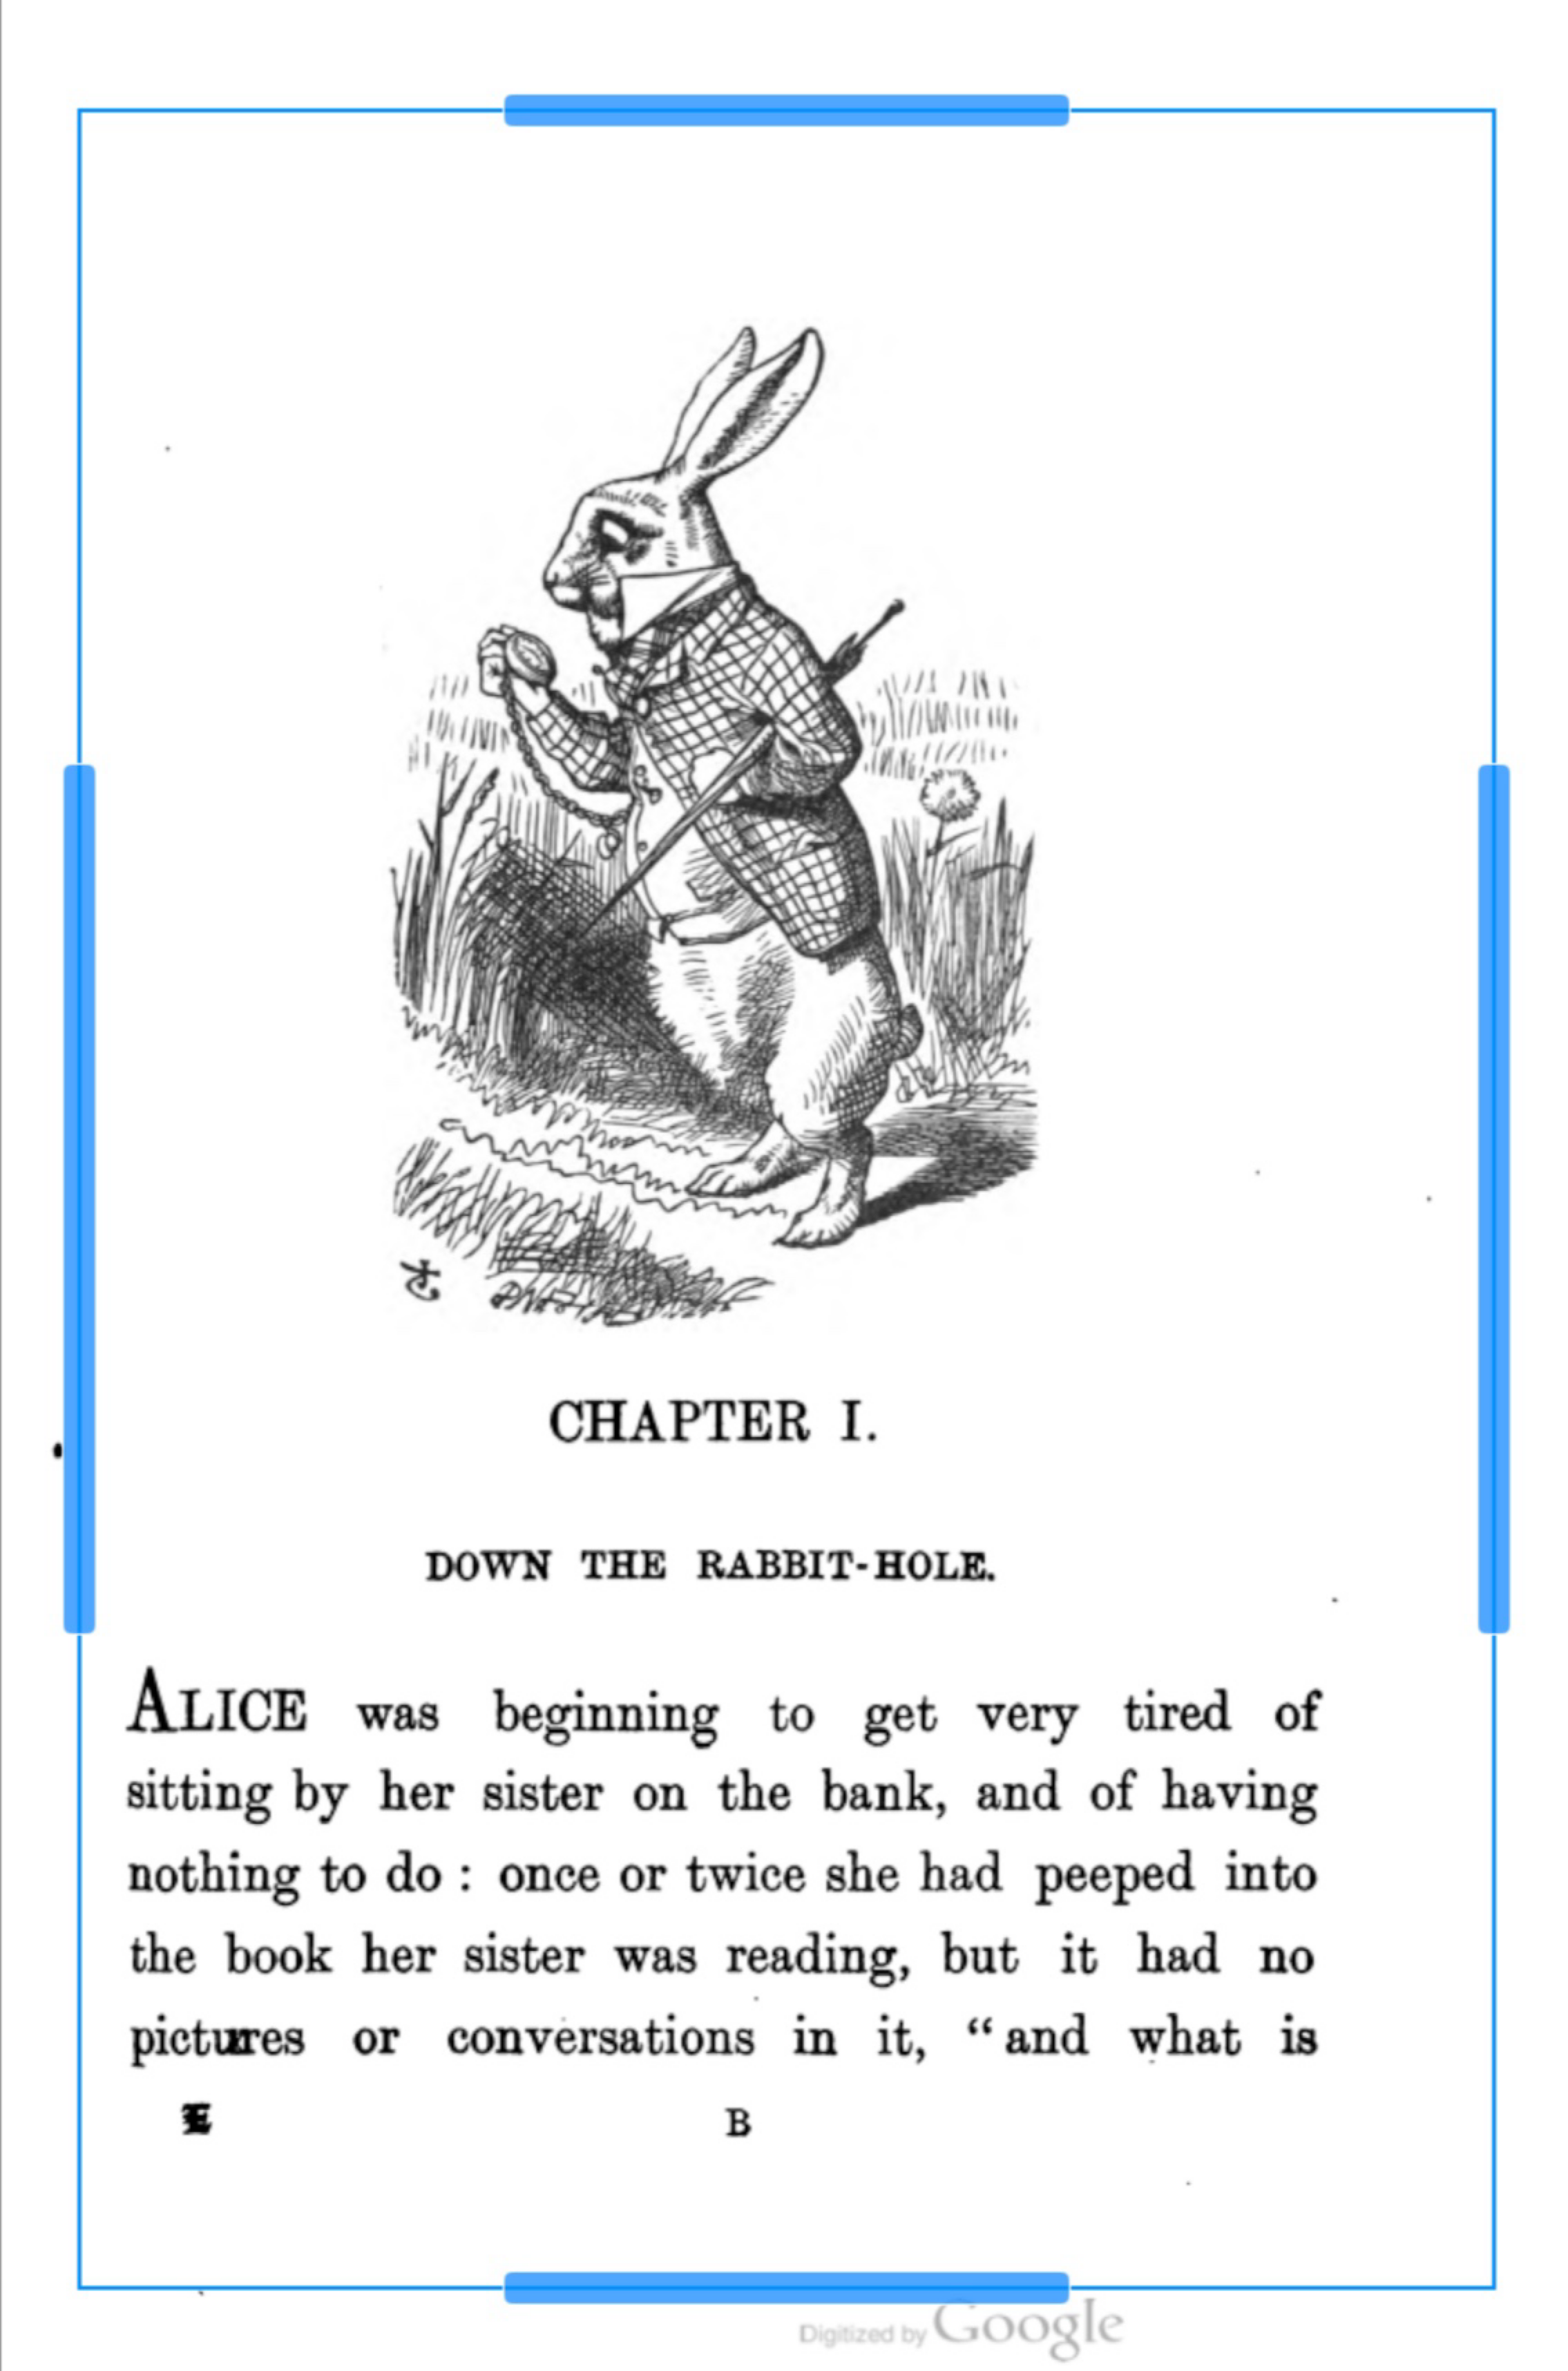
The center area shows the current page at 150 DPI with the crop overlay. The crop box border color indicates whether the page uses the odd template (green), even template (blue), a per-page override (orange), or is skipped (gray). Drag the edge handles to adjust the crop.
Zoom and Pan
Use pinch-to-zoom on a trackpad or View > Zoom In (Cmd++) / Zoom Out (Cmd+-) to zoom the page view. Scroll with two fingers to pan when zoomed in. Use View > Zoom to Fit (Cmd+0) to reset.
The viewport auto-adjusts when content changes (rotation, crop drag, lock toggle, page navigation) by zooming out or panning just enough to keep everything visible, without fighting your chosen position. Zoom is purely visual and does not affect crop coordinates or export.
Inspector Panel
The right panel contains all controls: Document Defaults (global templates for even/odd pages), Page Overrides (per-page crop, rotation, correction), and Export Options (uniform page size).
Status Bar
The bottom bar shows the current page number, even/odd designation, page dimensions (in 150 DPI pixels), rotation angle (if non-zero), and spine direction (if correction is enabled). Crop margins are stored as proportional percentages, so they scale correctly across pages of different sizes.

Color Coding
Colors indicate the source of settings throughout the app:
- Green: Odd page template (pages 1, 3, 5...)
- Blue: Even page template (pages 2, 4, 6...)
- Orange: Per-page override (custom settings for one page)
- Gray: Skipped page (excluded from export)
These colors appear on crop box borders, sidebar dots, inspector labels, and the spine position line on the canvas.
Navigation
Page Navigation
Use the Left/Right arrow keys to move between pages. You can also click any page thumbnail in the sidebar. The current page is highlighted in the sidebar list.
Page Reordering
Drag and drop pages in the sidebar to rearrange them, or use the up/down chevron buttons on each page row. The new order affects export output and even/odd template assignment (templates follow display position, not original PDF page number). Per-page overrides stay with their page regardless of position. Reordering is undoable with Cmd+Z.
Set Page 1
Right-click a page in the sidebar and choose "Set as Page 1" to designate it as page 1. Pages before it get numbered 0, -1, -2, etc. This affects even/odd template assignment: page 1 is always odd, page 2 is even, and so on. Use "Reset Page Numbering" (also in the right-click menu) to restore the default numbering.
Page Numbering Mode
When a project contains pages from multiple source PDFs, an arrow indicator appears next to the page numbers in the sidebar. The arrow points at the number that determines even/odd template assignment. Click the arrow area to toggle between:
- Project mode: uses project display order
- Document mode: uses original page numbers within each source PDF
In Document mode, Set Page 1 and Reset Page Numbering operate per-source-document, so each PDF independently controls its own page 1 offset.
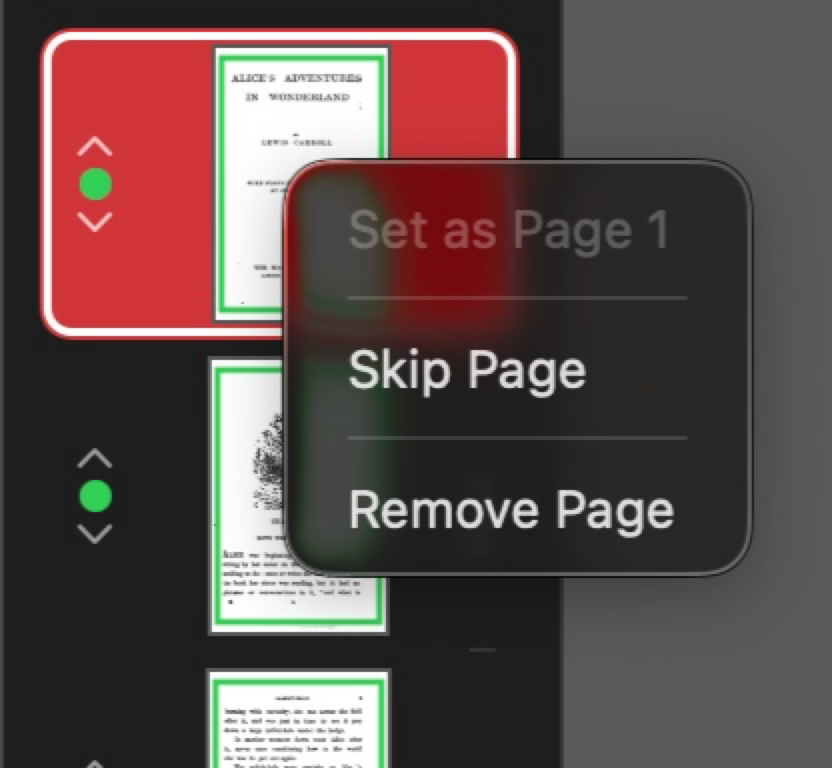
Removing Pages
Right-click a page in the sidebar to access page actions. Choose "Skip Page" to toggle skipping, or "Remove Page" to remove it from the project. You can also select a page and press Delete to remove it. Removing a page is undoable with Cmd+Z.
Close Project
Use File > Close Project (Cmd+W) to close the current project and return to the welcome screen. The project is saved automatically before closing. You can reopen it later from the recent projects list.
Document Defaults (Global Templates)
Template Modes
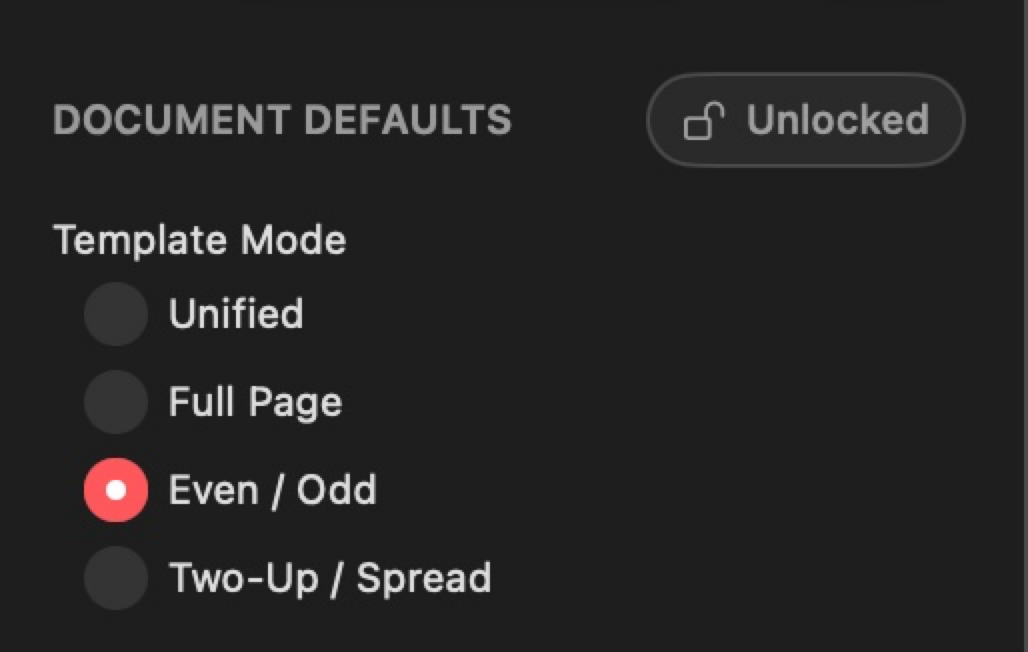
DeskewPro supports four template modes, selected using the radio buttons in the Document Defaults section:
- Even/Odd: Separate crop box templates for even and odd pages. Ideal for scanned books where left and right pages have different margins.
- Unified: A single template applied to all pages. Useful for center-spine scans or when all pages share the same margins.
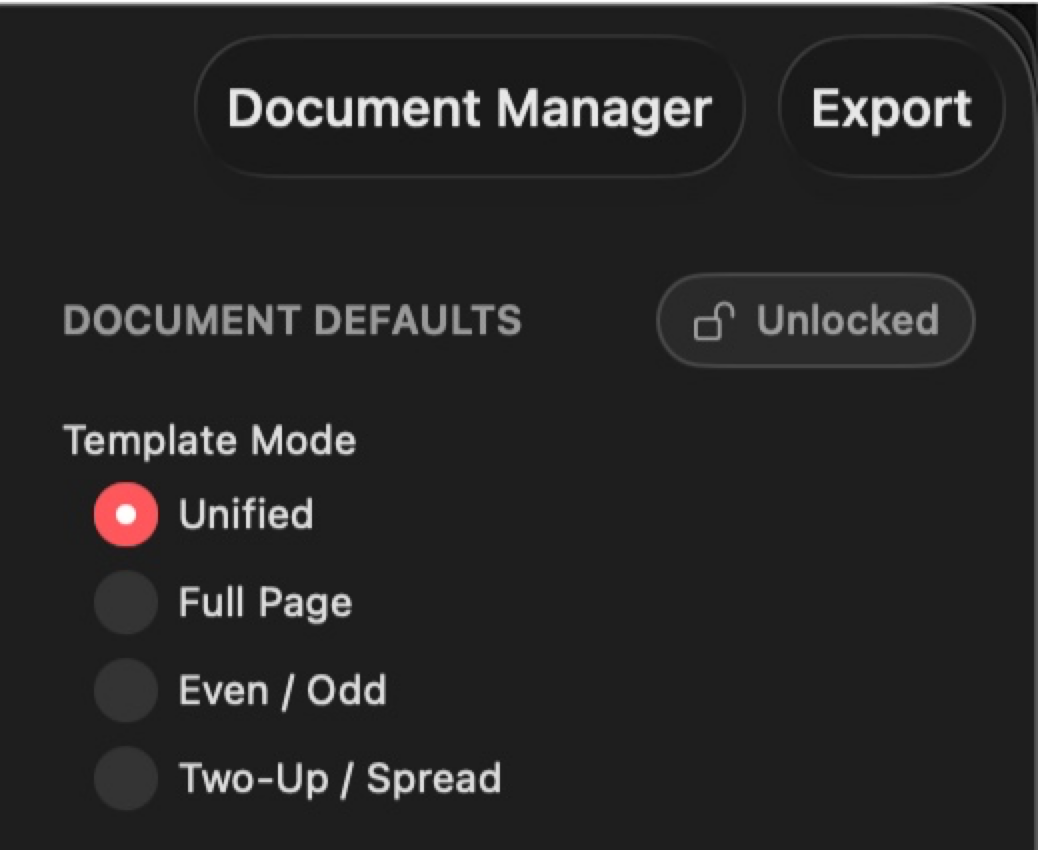
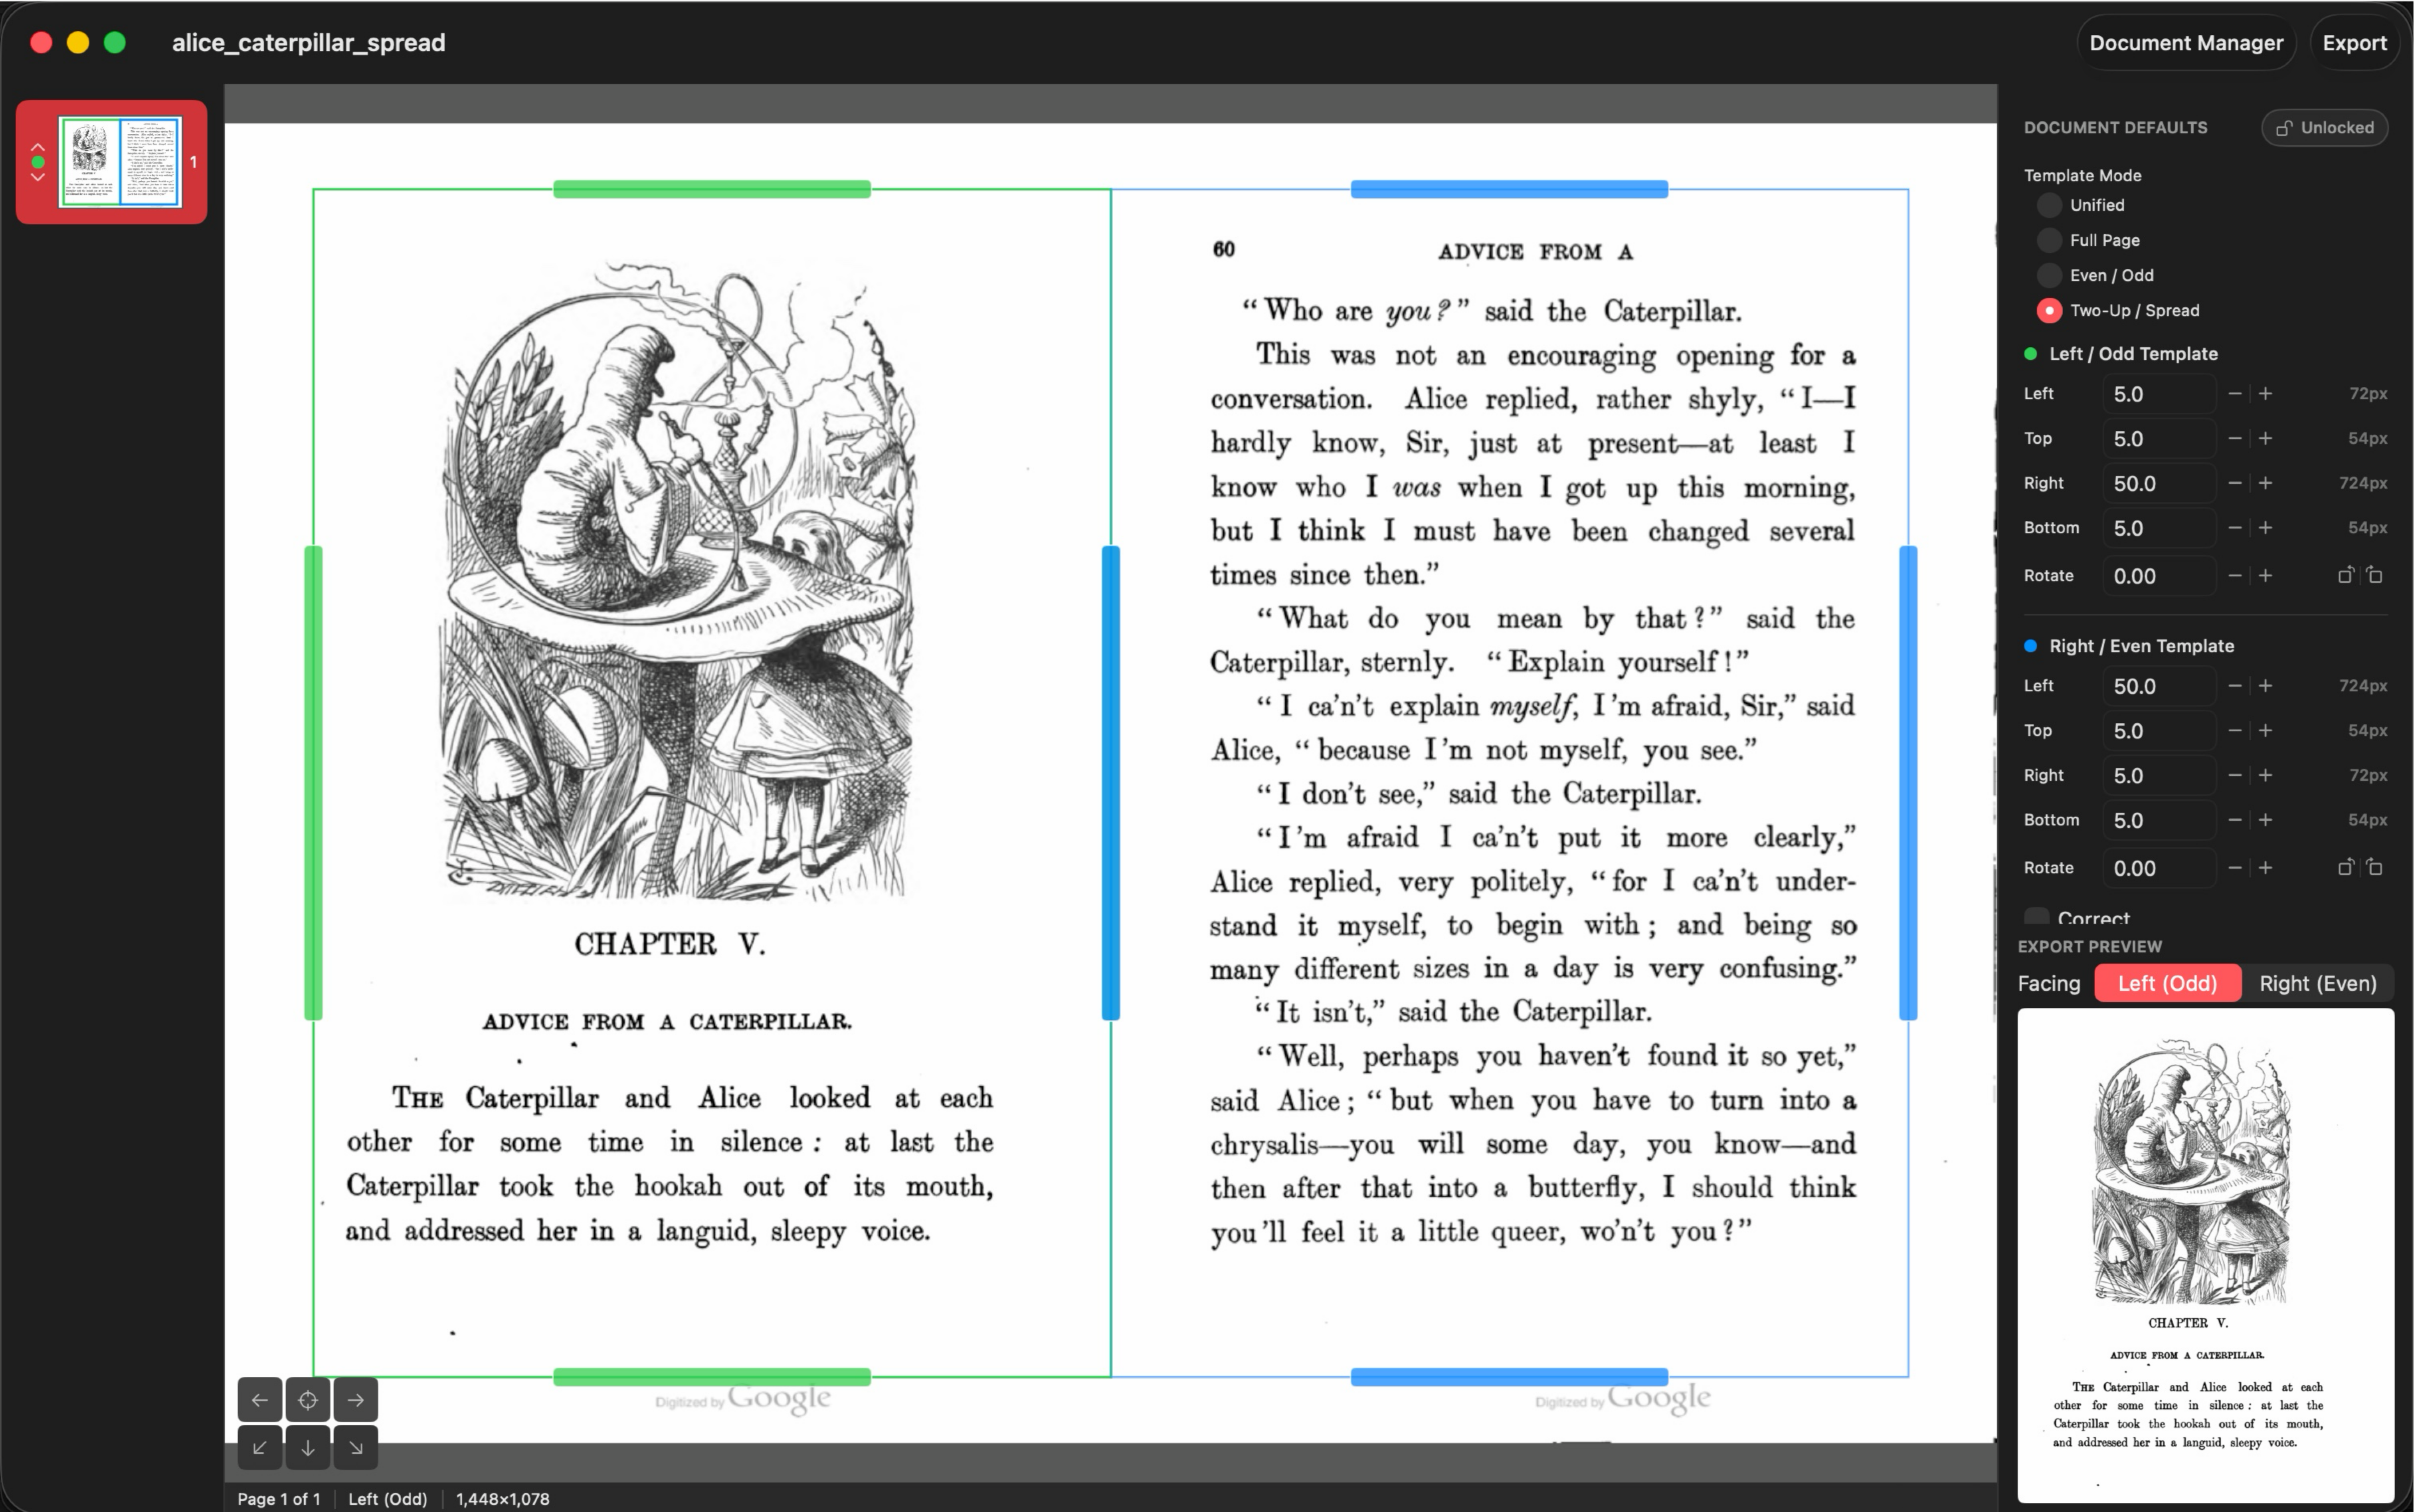
- Two-Up (Spread): Both even and odd templates apply to every page simultaneously. Use this when each scan captures two facing pages. The left side uses the odd template (green), the right side uses the even template (blue). Each input page produces two output pages on export. Rotation and correction are shared by the whole page (one image rotates one way); the two crop boxes are independent. To treat one two-up page as a single page instead, turn on "Single crop box" in its Page Overrides, which gives that page one crop box and one output page. Turning it off restores the split.
- Full Page: Every page exports at its full size with zero margins. The crop overlay shows a border outline but no drag handles. Rotation, correction, and skip still function normally.

Crop Box Fields
Each crop box is defined by four margin insets: Left, Top, Right, and Bottom. These are percentages of the page width (for Left/Right) or height (for Top/Bottom). For example, 10% on a 1000px-wide page means 100px from that edge. A pixel equivalent is shown next to each field for reference.
You can type exact values into the text fields or use the stepper buttons (step size: 0.5%). You can also drag the edge handles directly on the canvas. Because margins are proportional, the same crop settings work correctly across pages of different sizes.
Template Rotation

Each template (even/odd) has a rotation angle in degrees. Use the text field for precise values, the stepper (0.5 degree steps), or the inline 90-degree rotation buttons for quick quarter-turn adjustments. The crop box stays level on screen while the page rotates underneath, so what you see in the canvas is what you get on export. Rotation is applied visually on the canvas and during export.
Template Correction
Each template has a "Correct" toggle. When enabled, image correction is applied to all pages using that template. Below the toggle, stage controls (Deblur, Deskew, Lighting, Binarize), model selection (AI Model, Spine Physics), and parameter sliders appear. See Image Correction for the full control reference, and Binarization for black and white output.
Lock Defaults
The pill-shaped Lock/Unlock button next to "DOCUMENT DEFAULTS" controls whether global templates are protected from accidental edits:
- Locked (orange). Dragging crop handles or spine controls on the canvas automatically creates a per-page override instead of modifying the global template.
- Unlocked (gray). Dragging edits the global template directly.
This lets you set up your global defaults, lock them, and then work on per-page overrides without risk of changing the defaults.

Page Overrides
Crop Override
Toggle "Crop" in the Page Overrides section to give a page its own crop box, independent of the even/odd template. When enabled, the crop box border turns orange. The override starts as a copy of the current template values. Disable the toggle to revert to the template.

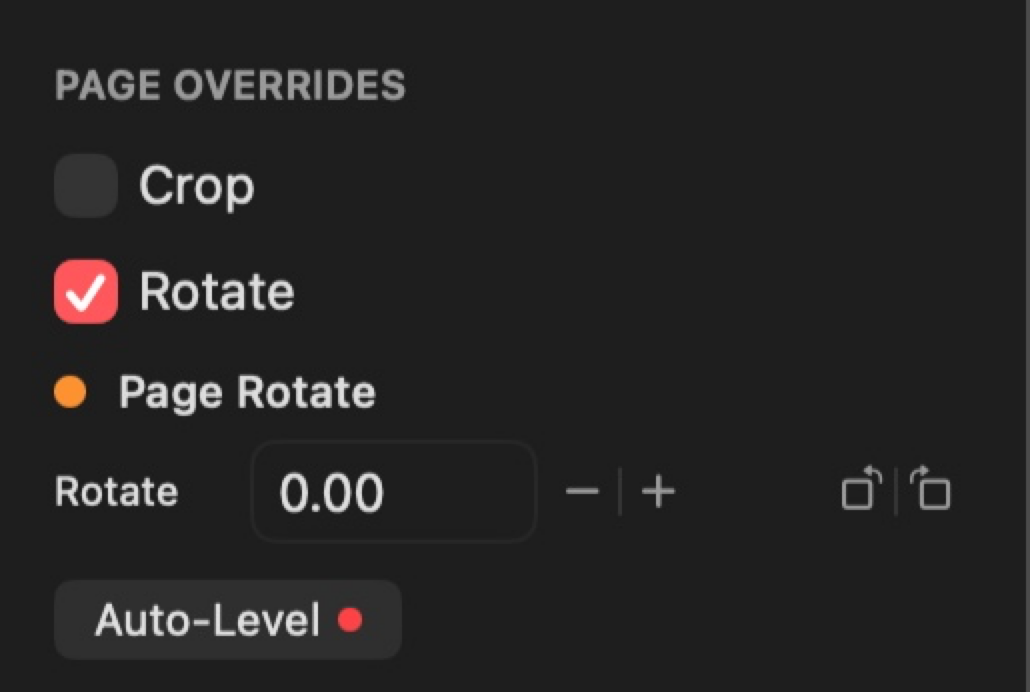
Rotation Override
Toggle "Rotate" to give a page its own rotation angle. When enabled, an orange rotation control appears. The override starts with the current template rotation value. Disable to revert to the template rotation.
Auto-Level
Click "Auto-Level" in the Page Overrides section to automatically detect and correct page skew. The app analyzes text line angles using Vision and applies a small rotation correction as a per-page override. A colored confidence dot appears next to the button:
- Green (70%+). High confidence
- Yellow (40%+). Moderate confidence
- Red (<40%). Low confidence
When you click Auto-Level, a dialog offers "This Page" or "All Pages". Choosing "All Pages" analyzes every page in the document, with a progress overlay that can be cancelled with Escape. All corrections are grouped into a single undo action.
Correction Override
Toggle "Correct" in overrides to give a page its own correction settings. An "Enabled" sub-toggle appears to turn correction on or off for this page independently of the template. When overridden, the spine position indicator on the canvas turns orange. Disable the override toggle to revert to the template settings.
Skip Page
Toggle "Skip" to exclude a page from export. Skipped pages appear grayed out in the sidebar with a gray dot, and their crop overlay turns gray. In Two-Up mode, each facing (left/odd and right/even) has its own skip toggle, so you can exclude just one side while keeping the other.
The Pages menu has bulk commands that apply to the whole document in one step (undoable): Skip All Pages, Unskip All Pages, and Invert Skipped Pages. Inverting is handy when you only want to export a few pages: skip those, then invert.
Image Correction
How It Works
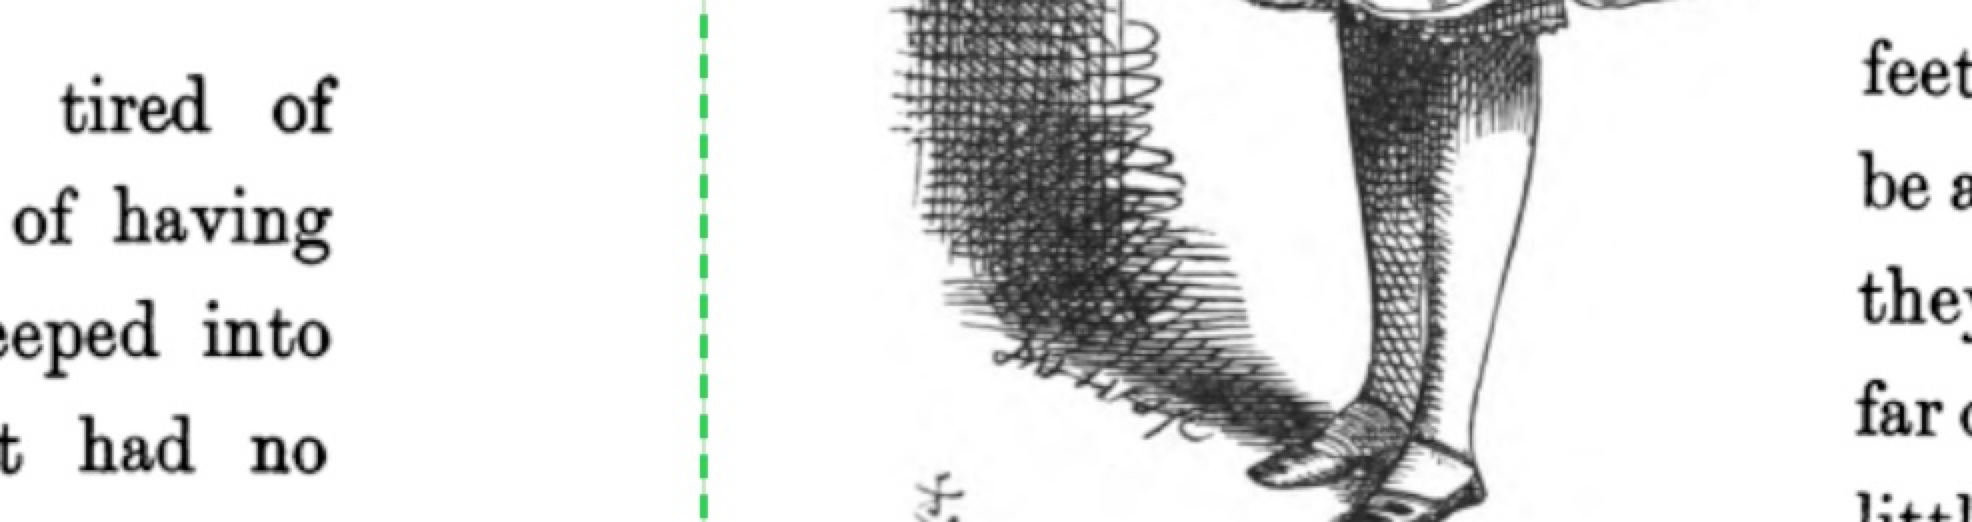
Image correction fixes the blur and warping that occurs near book spines in scanned pages. Toggle "Correct" in the inspector to enable it. The correction pipeline has two independent stages, each controlled by an Off/On toggle:
- Deblur (Richardson-Lucy deconvolution). Removes blur caused by the page curving away from the scanner glass.
- Deskew (mesh-based displacement). Straightens curved text lines near the spine.
Each stage can be turned on or off independently. If both stages are off, the inspector shows "All stages are off. No correction will be applied."
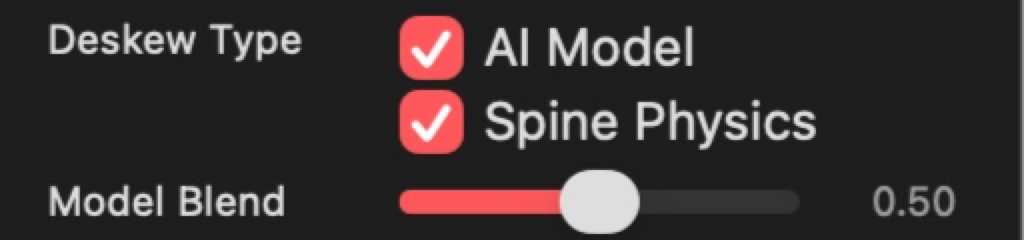
Deskew Type
When Deskew is on, a "Deskew Type" section appears with two checkboxes that control which model drives the dewarping:
- AI Model: uses a neural network (UVDoc) that estimates page curvature directly from the image content. No manual spine positioning is needed.
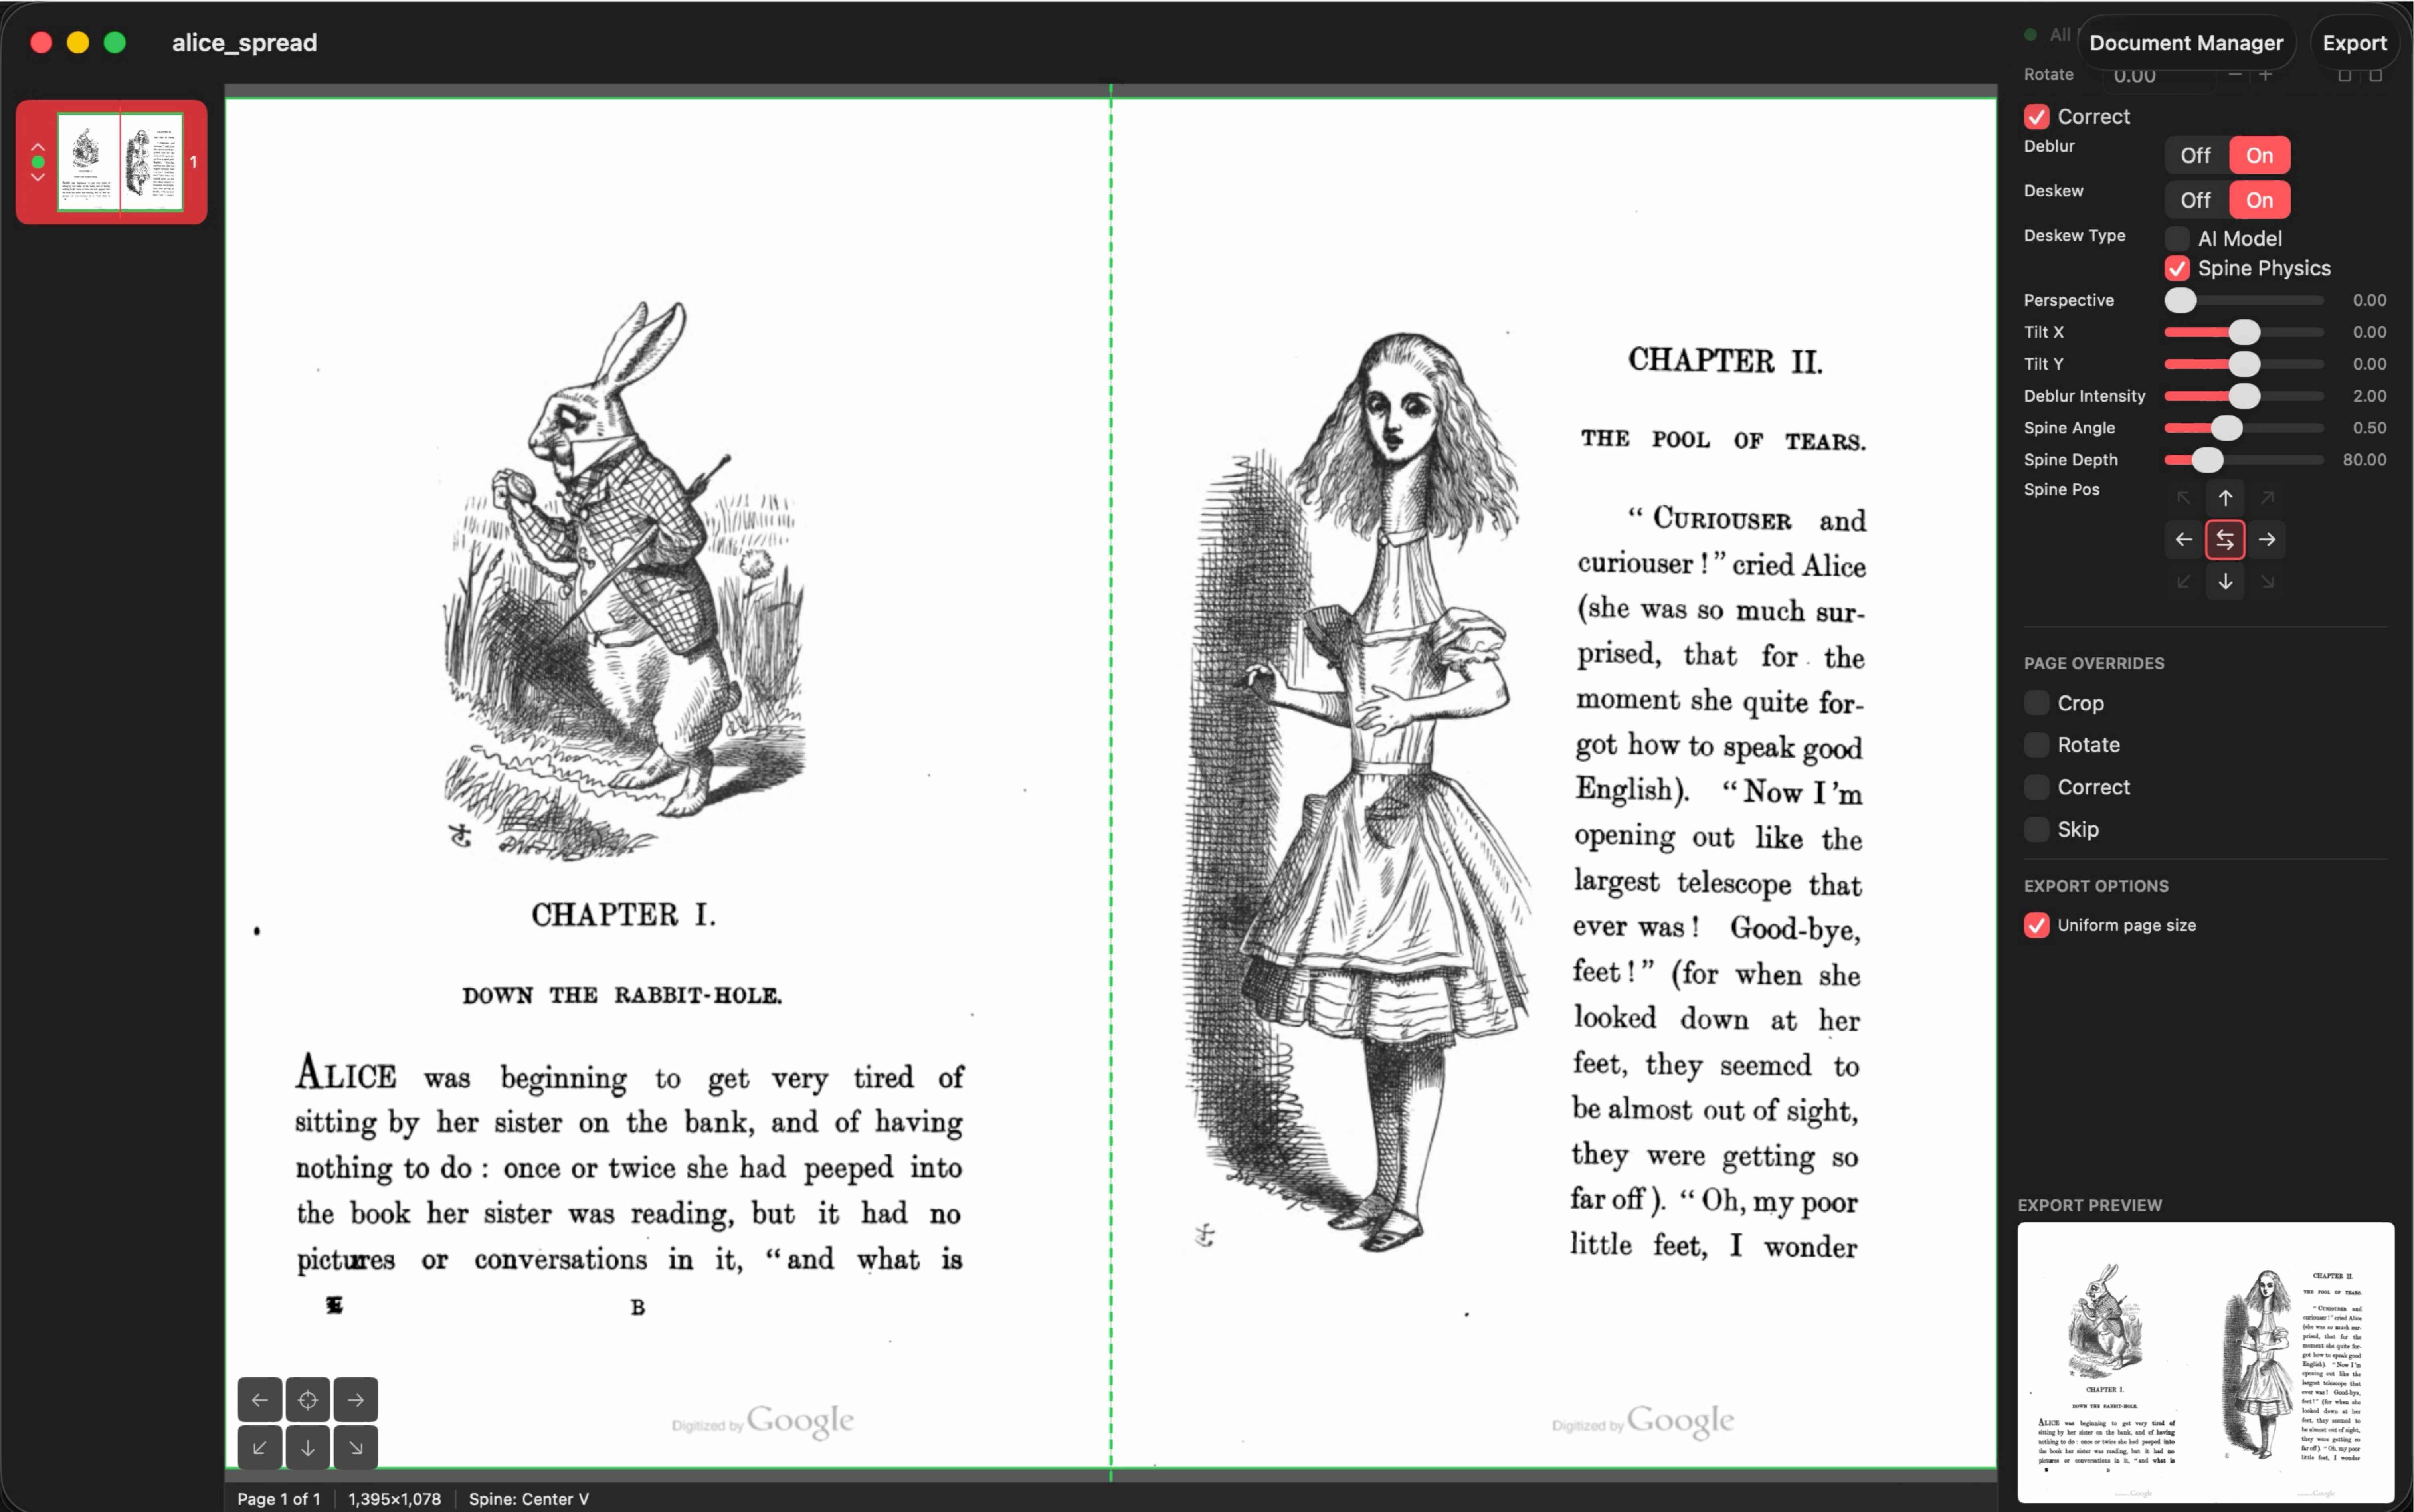
- Spine Physics: uses a physics-based Euler elastica model that simulates how a book page curves at the spine. Requires manual spine positioning.
Check both for a blended mode. Uncheck both to disable dewarping while keeping Deblur active.
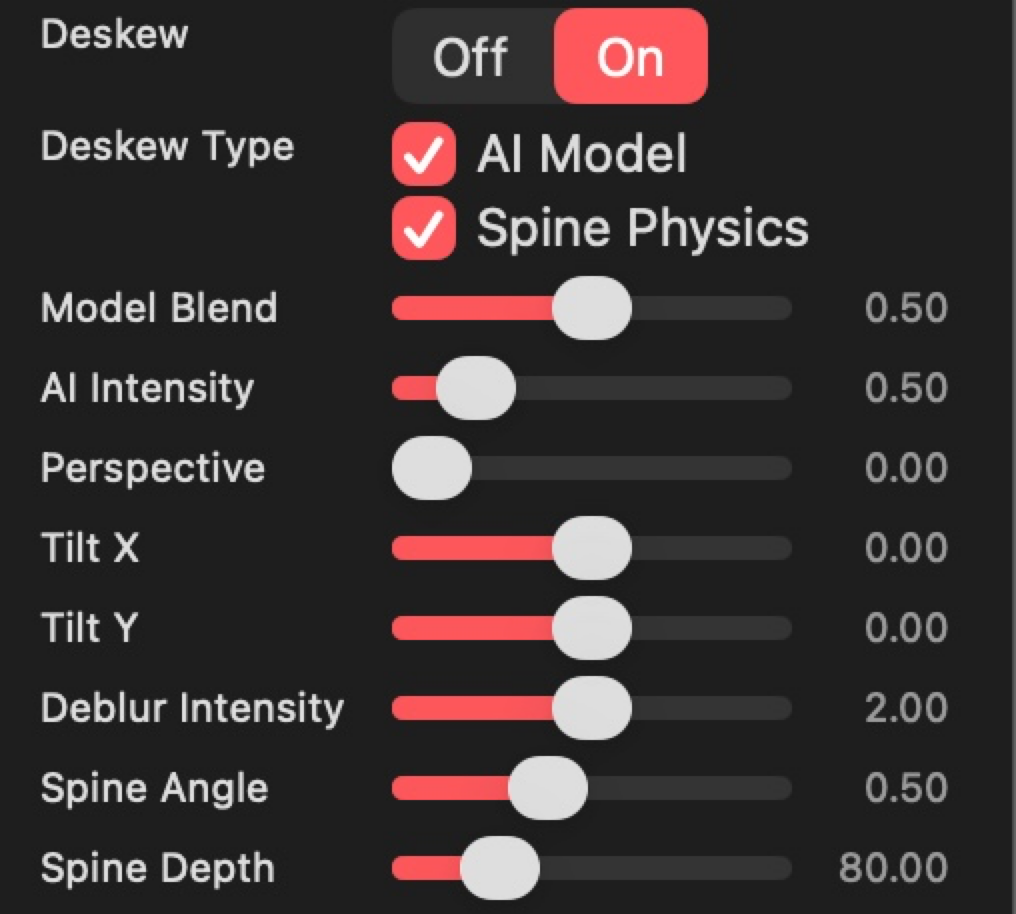
Model Blend
Appears when both AI Model and Spine Physics are checked. A slider (0.0 to 1.0) controls the mix between the two models: 0.0 = pure Spine Physics, 1.0 = pure AI, 0.5 = equal blend. Useful when one model captures certain distortions better than the other.
AI Intensity
Appears when AI Model is checked. Scales the AI dewarping strength (0.1 to 3.0, default 0.5). Values below 1.0 reduce the correction for subtle adjustments. Values above 1.0 amplify it for heavily warped pages.
Spine Position and Direction
When Spine Physics is checked, a "Spine Pos" row appears with a 3x3 direction pad for quick positioning. The four cardinal buttons set the spine to the corresponding edge (Left, Right, Top, Bottom). The center button toggles between center-vertical and center-horizontal. The currently matching direction is highlighted. Diagonal buttons are disabled.

On the canvas, a draggable spine line appears on the crop region showing the spine position. The line is vertical (for left/right/center-vertical spines) or horizontal (for top/bottom/center-horizontal spines). Drag it to fine-tune the position. The line color follows the standard color scheme.
Physics Sliders
These sliders appear when Spine Physics is checked. They model the 3D shape of a curved book page:
- Spine Angle: how steeply the page lifts at the spine (0.1 to 1.2 radians)
- Spine Depth: how far the curl extends from the spine (20 to 300 pixels)
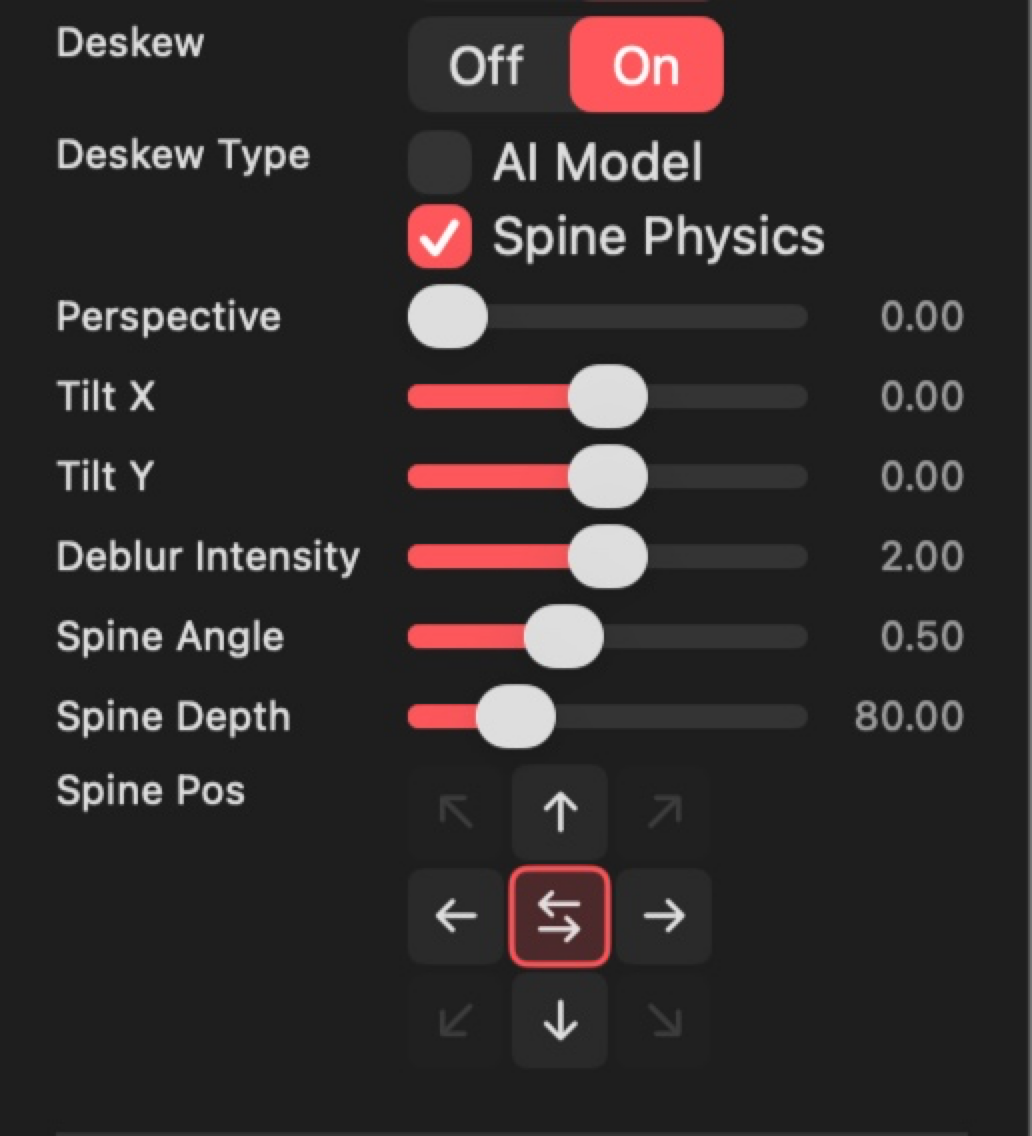
Shared Deskew Sliders
These sliders appear whenever any deskew model is active (AI Model, Spine Physics, or both):
- Perspective: corrects text-line curvature caused by the scanner viewing the curved page at a finite distance (0 = off, 100 = maximum correction)
- Tilt X: biases the curvature correction left or right to compensate for off-center camera positions (-1.0 to 1.0, 0 = symmetric)
- Tilt Y: biases the curvature correction up or down (-1.0 to 1.0, 0 = symmetric)
Deblur Intensity
Appears when Deblur is on and a correction source is active. A slider (0.0 to 4.0, default 2.0) controls the deconvolution strength. Higher values apply stronger blur removal. Adjust based on how severe the spine blur is.

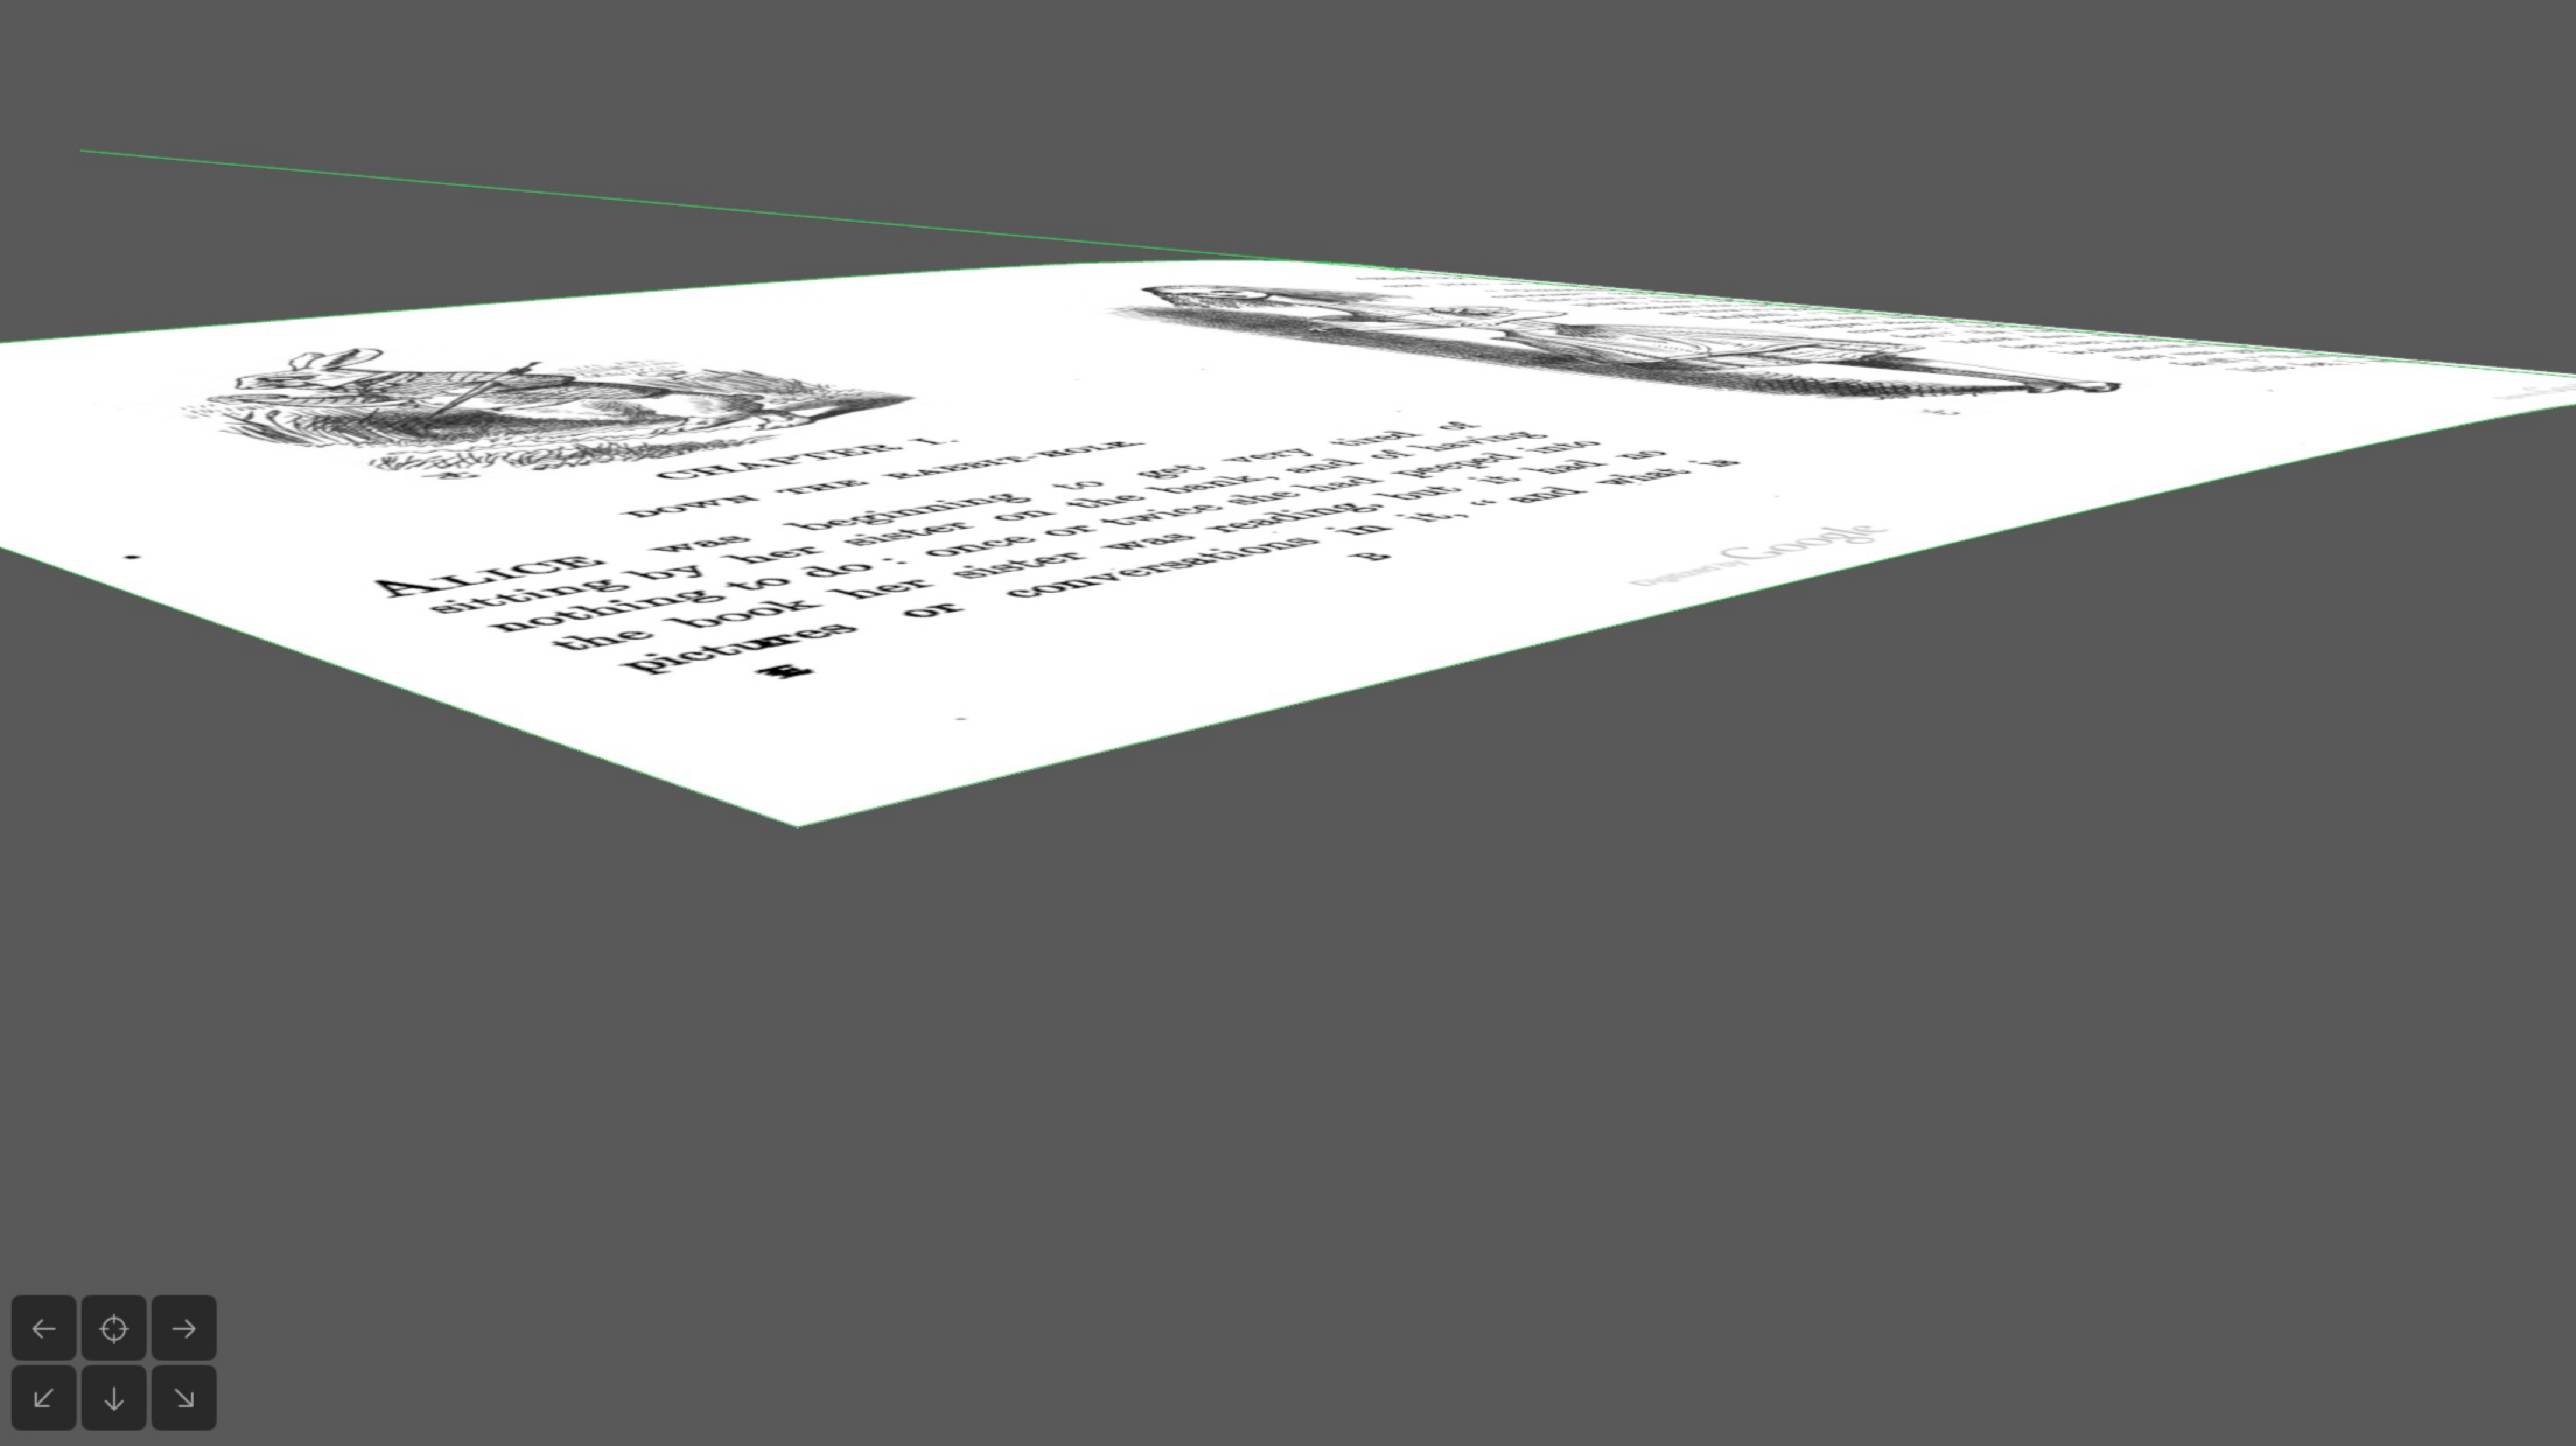
3D Viewport
When correction is enabled, the main viewport shows the page curved in 3D according to the current model. Click and drag on empty viewport space to orbit the view. Double-click to return to top-down. Six camera preset buttons appear at the bottom-left of the canvas: Left, Top (Ortho), Right, Low Front-Left, Low Front, and Low Front-Right.
Illumination Correction (Even Lighting)
Illumination correction flattens uneven page lighting. It fixes the darkening toward the edges that flatbed scanners produce, the shadow that falls across a page near the book spine, and the vignetting from overhead-camera setups. This is different from Deblur and Deskew. Those sharpen detail and straighten geometry. Illumination correction works on the slow brightness gradient across the page, so text near a dark edge reads as clearly as text in the center.
Illumination correction is a correction stage. Turn on "Correct" in Document Defaults (or in a page override), then enable the "Lighting" stage. It runs before the other stages, so Deblur and Binarize both work on an evenly lit page. When Lighting is on, a "Method" control and two sliders appear:
- Method: Gaussian estimates the background brightness with a smooth blur and is the best choice for most scans. Morphological estimates the background by filling in the text, which handles heavy, sharp spine shadows better. On an evenly lit scan the two look nearly identical.
- Strength: how much of the correction to apply. 0 leaves the page untouched and 1 fully flattens the lighting, which is a good starting point. Push above 1 for stubborn deep shadows, or lower it if the correction looks too aggressive.
- Radius: the size of the area used to estimate the background lighting. Larger values follow only the broad gradient and leave fine detail alone. The value stays consistent at any export resolution.
The export preview reflects illumination correction, so you can tune these and see the result before exporting. Because it corrects brightness rather than color, it leaves color pages and photographs hue-stable.
Binarization (Black and White)
Binarization converts a scanned page to pure black and white. It is the format archives, libraries, and OCR pipelines prefer for text documents, because the files are much smaller and the text is crisp.
Binarization is a correction stage. Turn on "Correct" in Document Defaults (or in a page override), then enable the "Binarize" stage alongside Deblur and Deskew. When Binarize is on, a "Method" control, two sliders, and a "Show-Thru" toggle appear:
- Method: Sauvola is adaptive thresholding that adjusts to uneven scan lighting across the page, and is the best choice for most text scans. Wolf is a variant tuned for low-contrast pages, where the text and background gray levels are close together. On a well-exposed scan the two look nearly identical; Wolf only pulls ahead on faded or low-contrast pages.
- Detail: the size of the local area used to choose each pixel's threshold, in millimeters, so it stays consistent at any export resolution.
- Threshold: sensitivity. Lower keeps more faint marks, higher produces cleaner whites.
- Show-Thru: suppresses bleed-through on thin paper. When a page is printed on both sides, faint text and images from the reverse side can show through and get picked up as gray haze or speckle. Turn this on to flatten that show-through to clean white before the page is converted to black and white. It only acts where the background is actually depressed, so a clean page is left unchanged. The Strength slider that appears below controls how hard it pushes. Leave it off for single-sided or heavier stock, where it is not needed.
The export preview reflects binarization, so you can tune these and see the result before exporting.
Binarization is destructive, so it is meant for text pages. It is not suitable for photographs or halftone images. To keep a photo page in color, give that page a correction override (turn on "Correct" for the page) and leave its Binarize stage off, while the rest of the document binarizes.
Binarization works together with searchable text (OCR) and Archival Format (PDF/A). Text recognition runs on the clean page before binarization, so the searchable layer stays accurate, and the black and white output remains PDF/A compliant. The binarized pages are stored with CCITT Group 4 compression, the standard for bitonal archival documents.
Multi-PDF Projects
Opening Multiple Files
When using "Open File...", you can select multiple PDFs and images, in any combination. The Document Manager dialog appears so you can arrange the order of the documents before they are loaded. Pages from all documents are combined into a single project in the order you specify.
Adding Files to a Project
Use File > Add File(s)... to add more PDFs or images to an open project. To add a whole folder of images at once, use File > Add Image Folder.... You can also add files or folders directly from the Document Manager by clicking "Add File..." (folders expand to their image files in filename order), or by dragging them onto the window. New documents are marked with a blue badge.
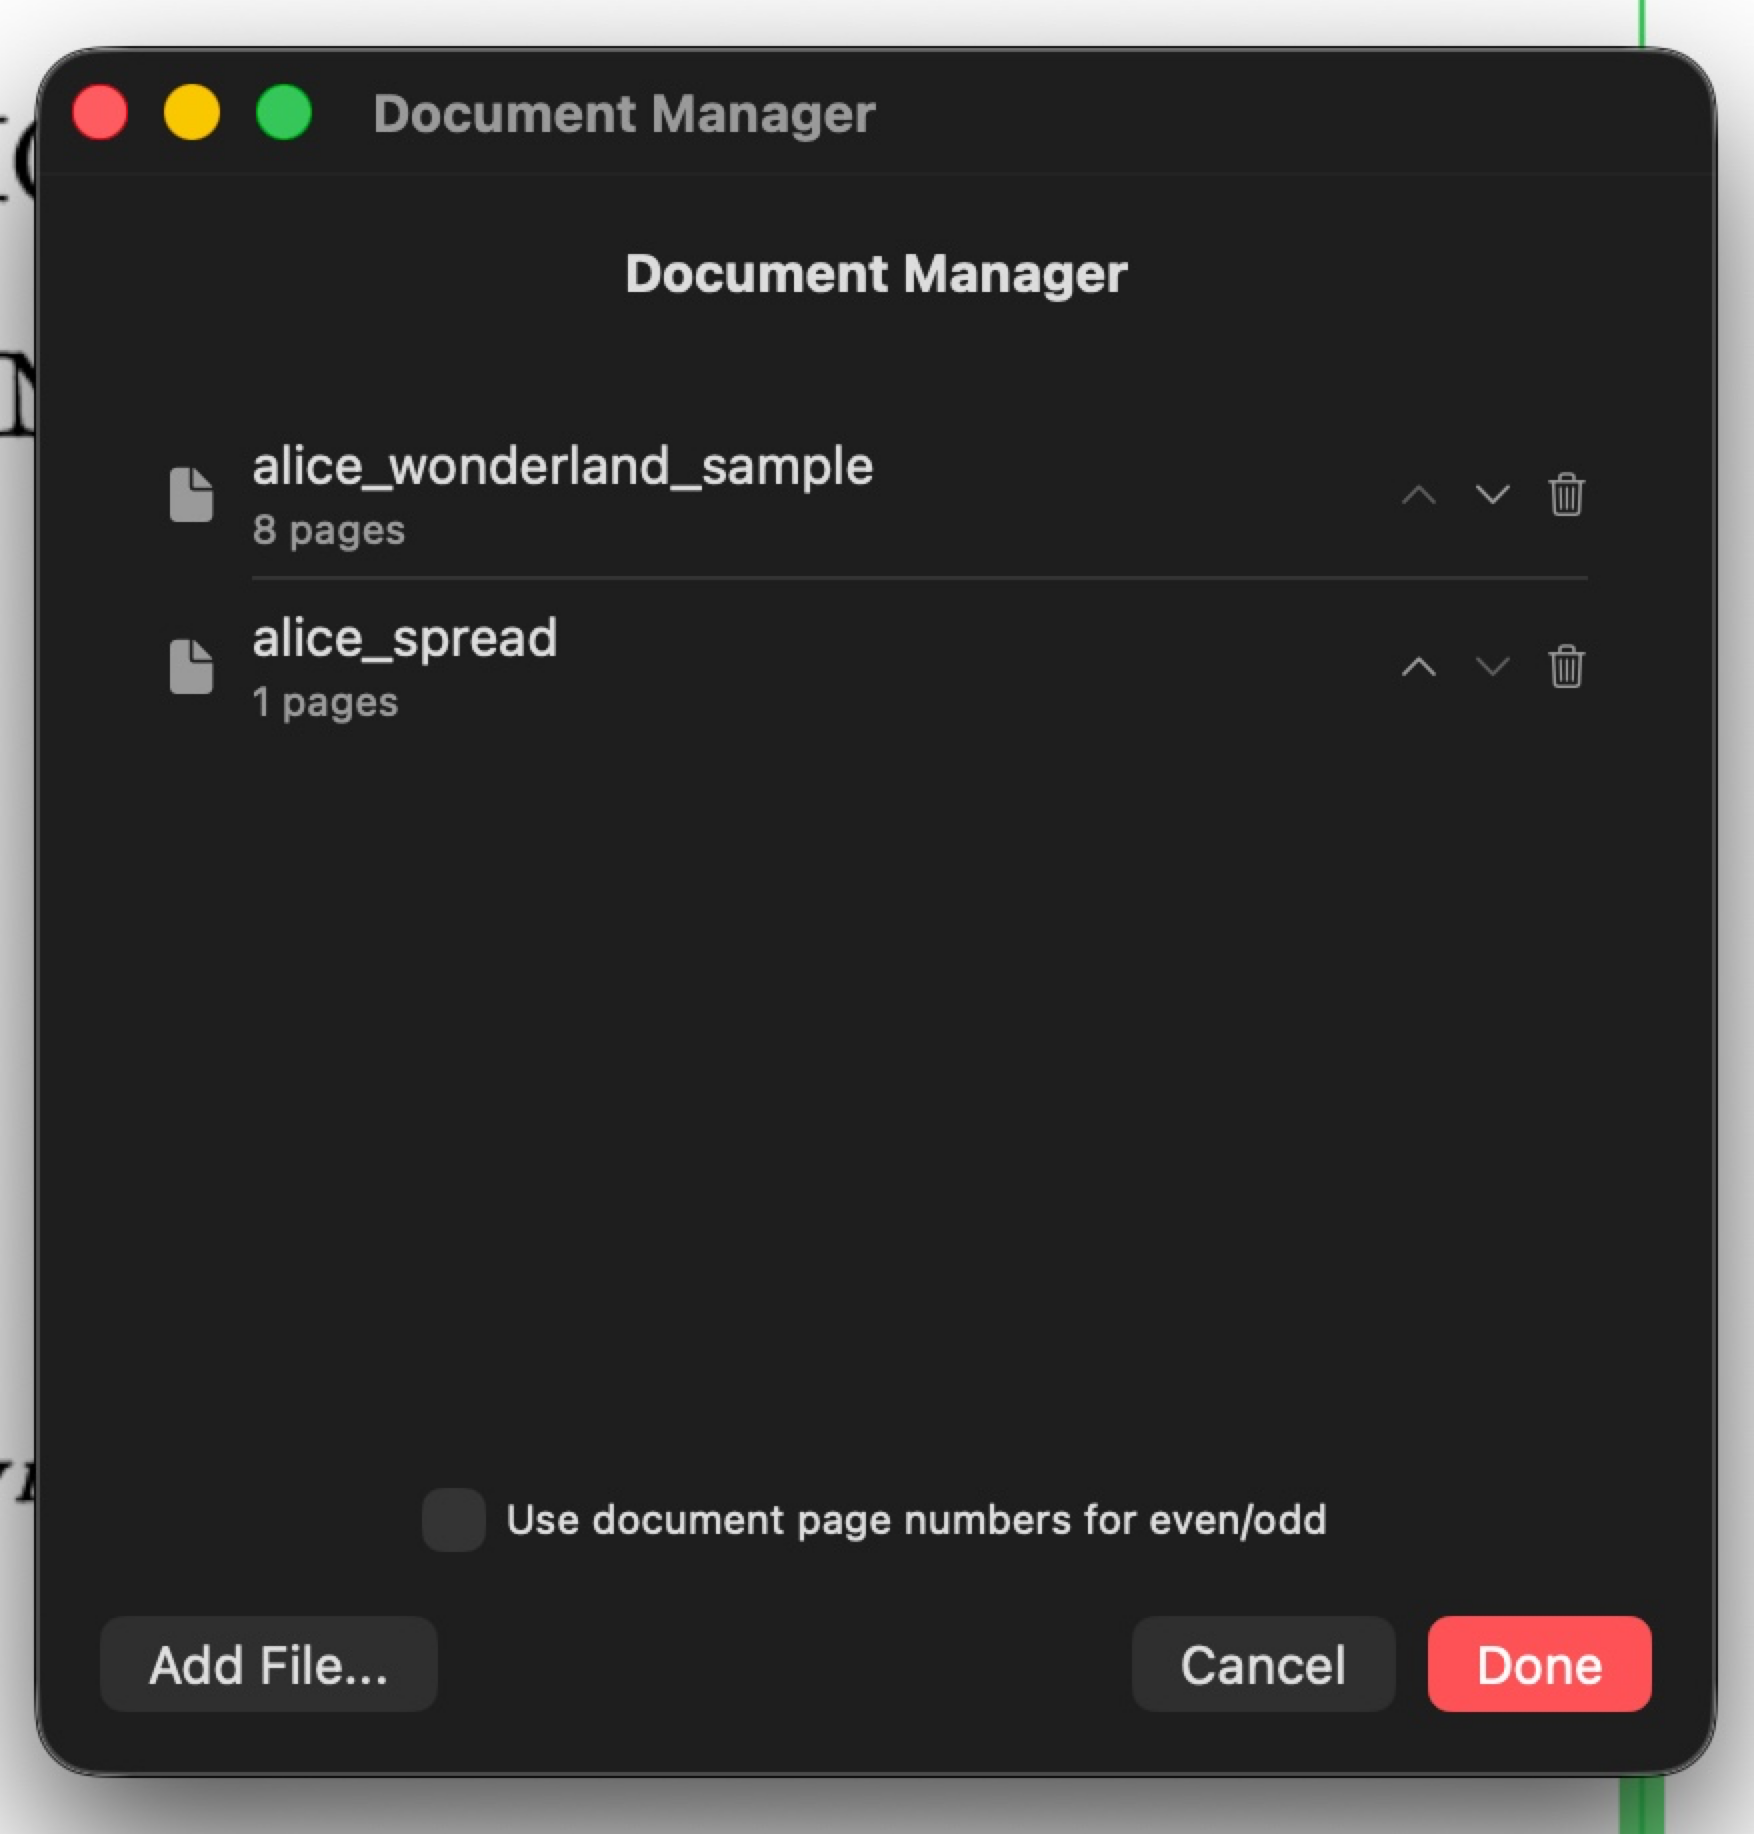
Document Manager
The Document Manager opens as a separate window that you can move and resize, which is useful when document names are long. Use the up/down chevron buttons next to each document to reorder them, or use the "Sort by" control to order them all at once by filename, date modified, or capture date. Click "Add File..." to add more PDFs or images without leaving the dialog.
When pages from different documents have been interleaved (by manual page reordering), they appear as a single "Merged" group. Use the "Unmerge" button to split them back into individual documents.
For multi-document projects, a "Use document page numbers for even/odd" toggle appears. When enabled, even/odd template assignment uses the original page number within each source PDF instead of the project display order.
Removing Documents
In the Document Manager dialog, click the trash icon next to a document group to remove it and all its pages from the project. At least one document must remain. The removal takes effect when you confirm the dialog and is undoable with Cmd+Z.
Export
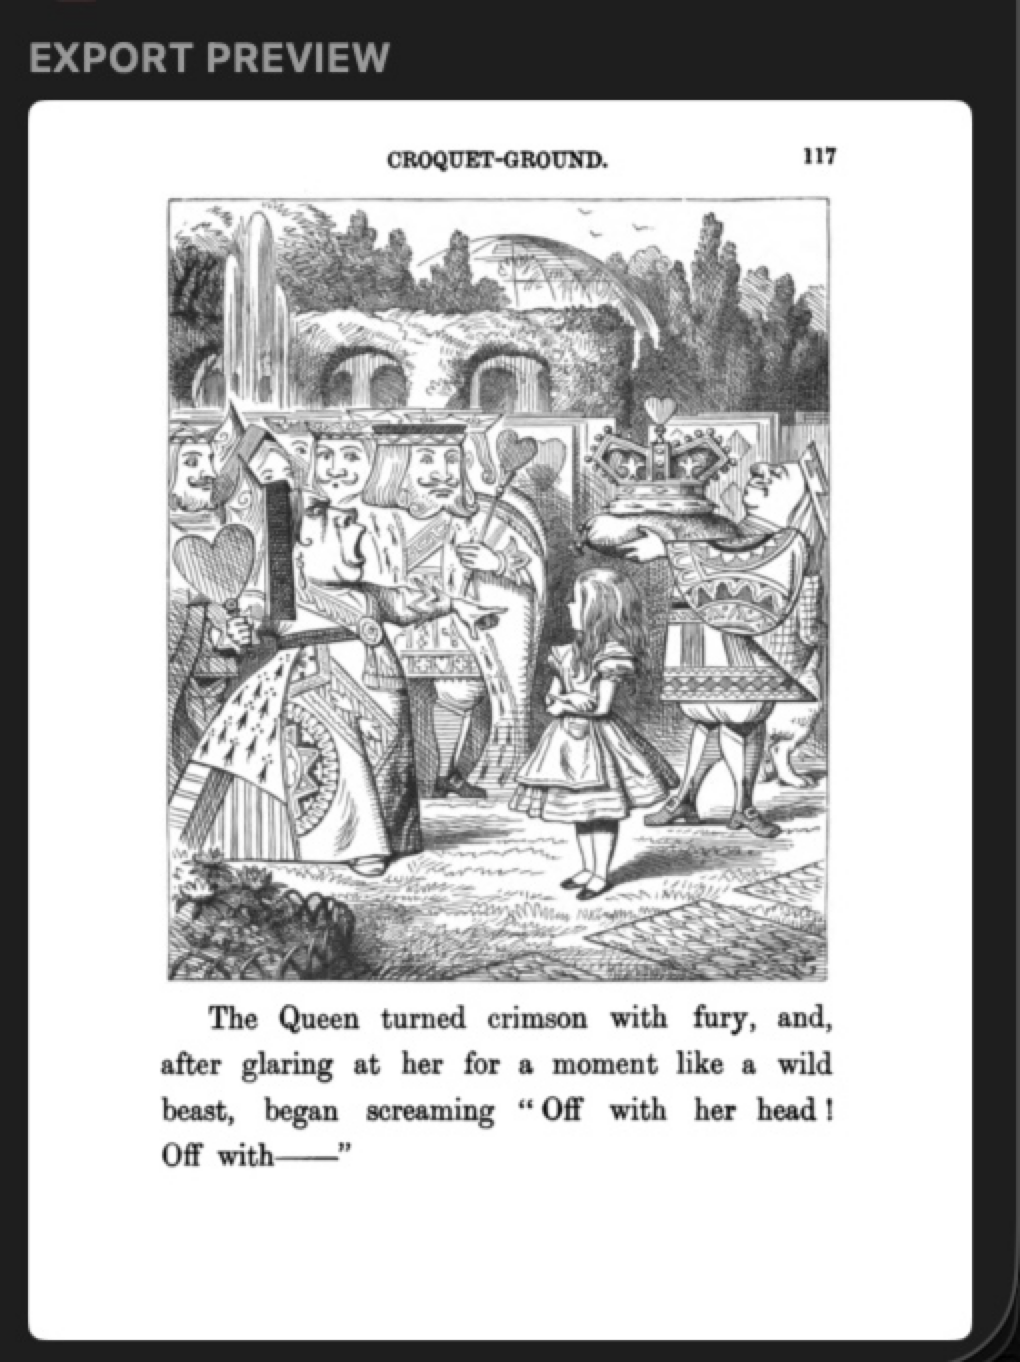
Export Preview
The "EXPORT PREVIEW" panel shows a rendered preview of how the current page will look after export, with all crop, rotation, and correction applied. In Two-Up mode, a "Facing" picker lets you switch between viewing the Left (Odd) and Right (Even) output.
Exporting a PDF
Use File > Export (Cmd+E) to export. DeskewPro opens a save dialog, then rasterizes each non-skipped page in display order, applying crop, rotation, and correction. A progress overlay shows export status and can be cancelled with Escape. When complete, the exported file is revealed in Finder.
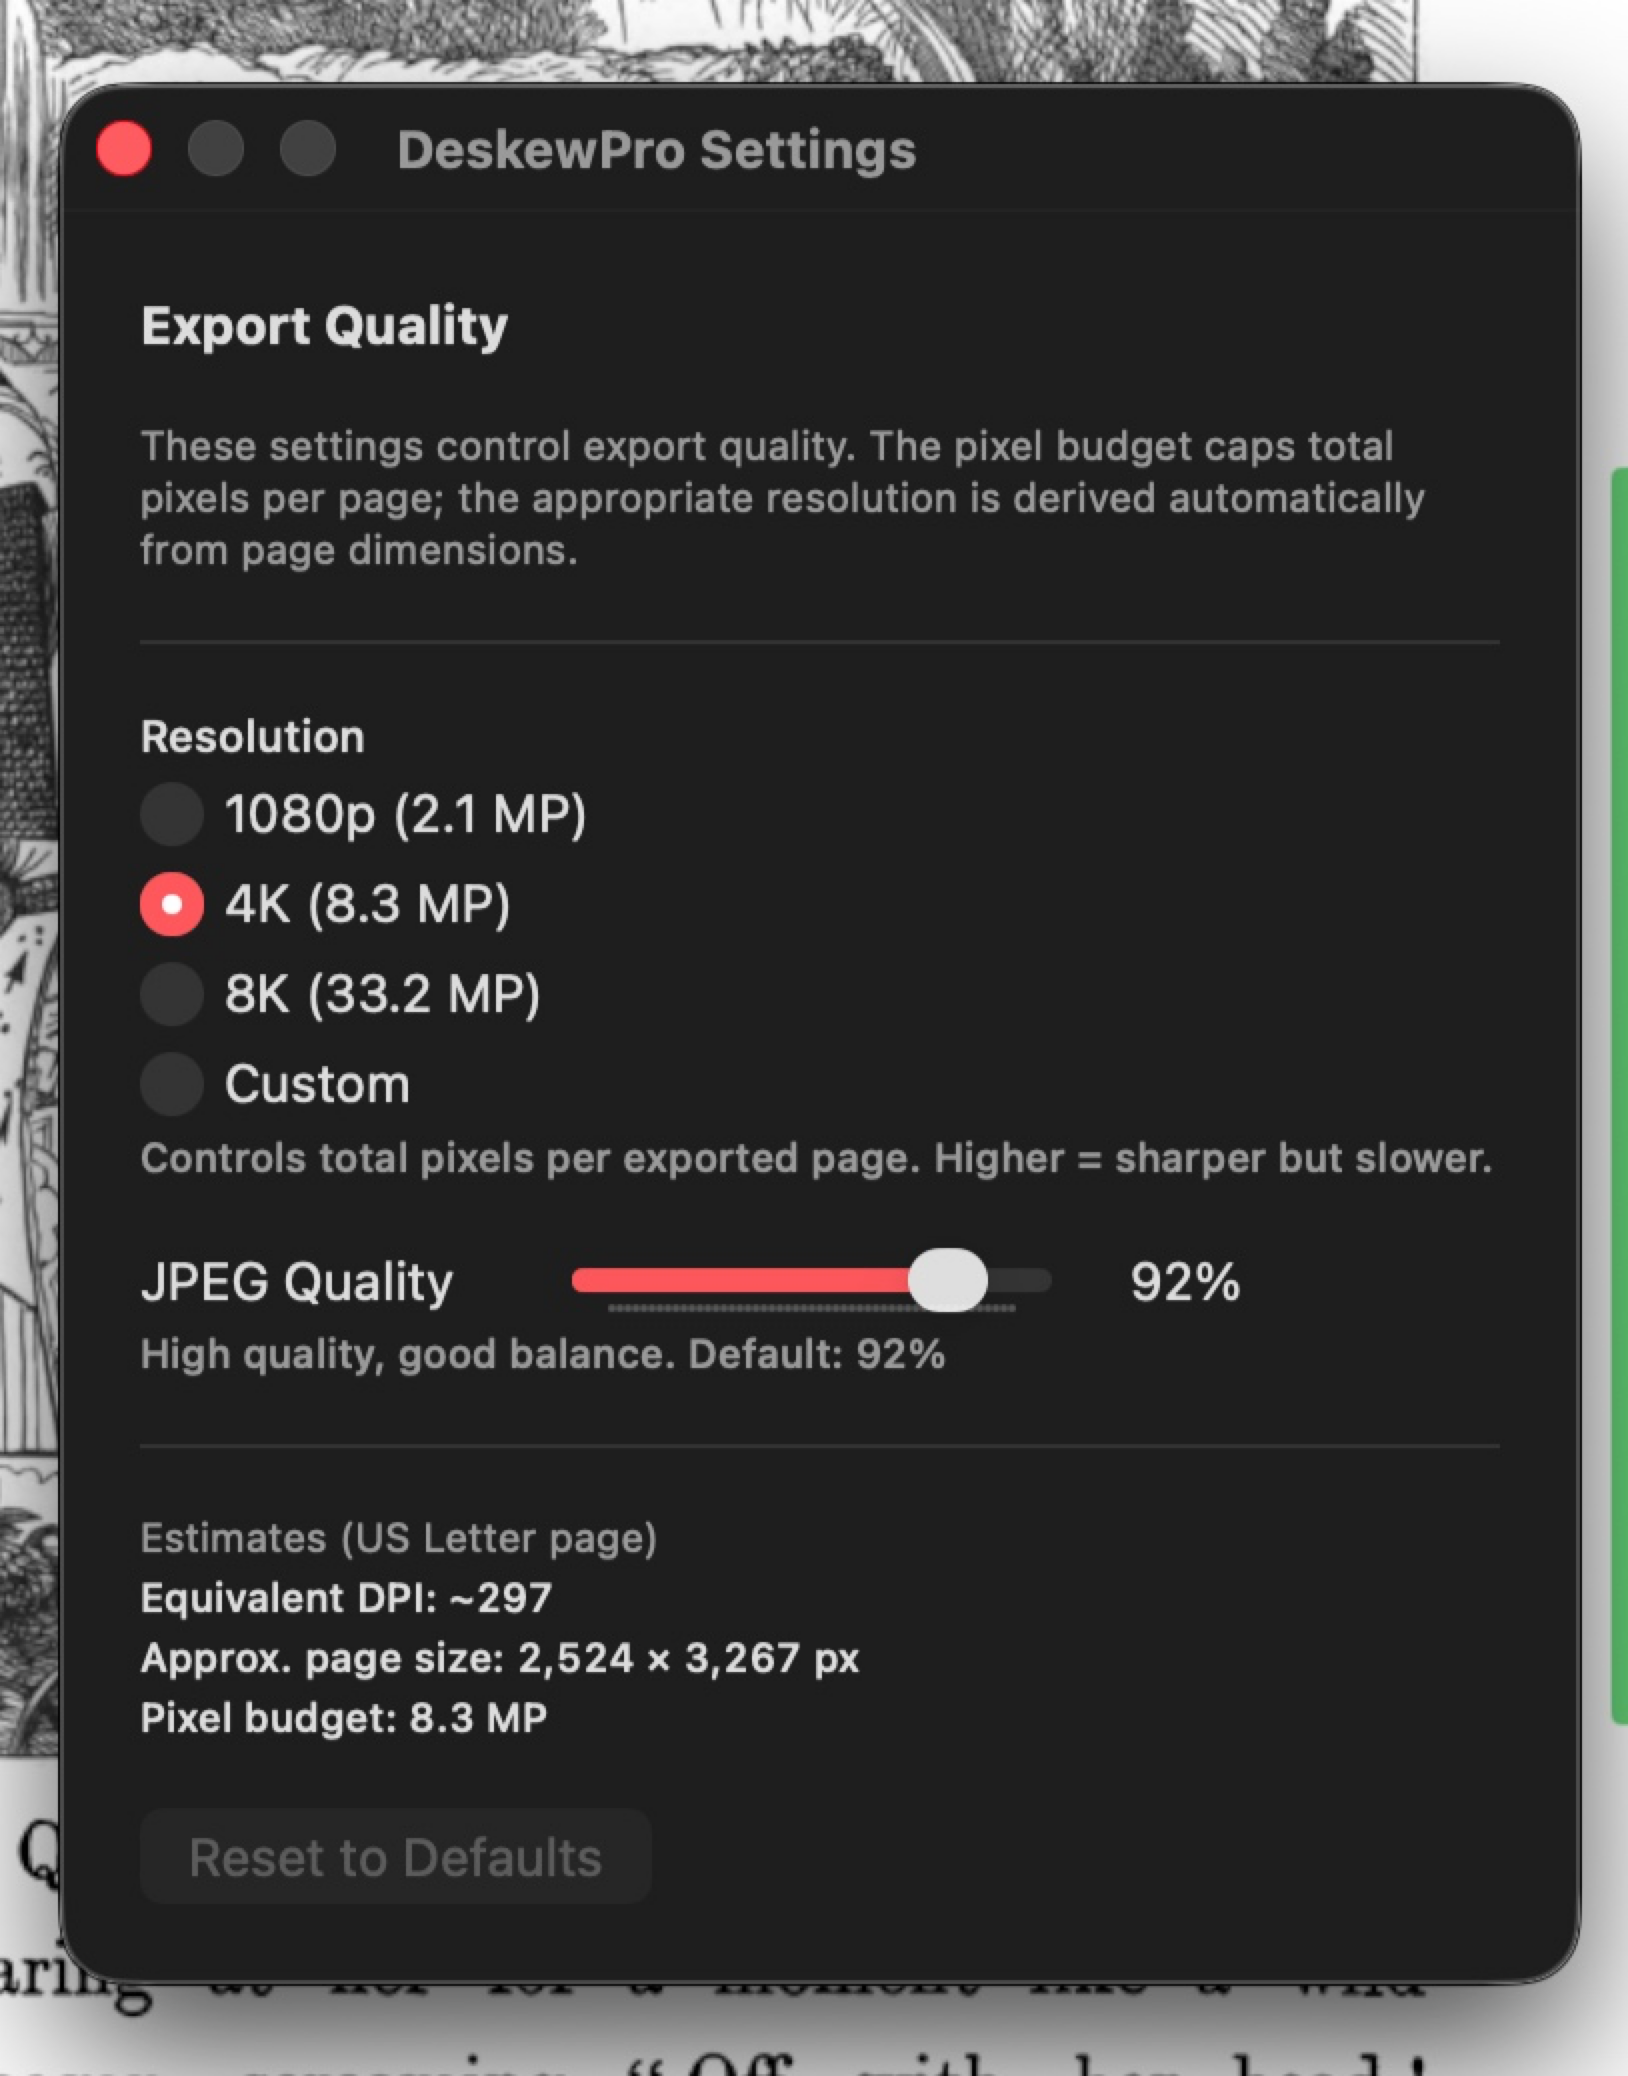
Export Quality Settings
Open via DeskewPro > Settings (Cmd+,). These are global settings that control export quality:
- Resolution Preset: choose 1080p (2.1 MP), 4K (8.3 MP, default), 8K (33.2 MP), or Custom to set the total pixel budget per page. The appropriate resolution is derived automatically from each page's dimensions.
- JPEG Quality (default 92%). Compression quality for cached export pages. Higher means better quality but larger files.
- Embed searchable text (OCR) (off by default). When enabled, DeskewPro adds an invisible text layer to the exported PDF so it is searchable and selectable. Text recognition runs on-device. This adds roughly 5 to 30 seconds per 100 pages. OCR re-runs on every export, so the searchable text always matches the current crop and rotation, even if the source PDF was already OCR'd before.
- Archival Format (PDF/A) (None by default). Choose PDF/A-2b to export a self-contained archival PDF. PDF/A is the long-term preservation standard required by many libraries, government archives, and institutional digitization projects. The exported file embeds an sRGB color profile and conformance metadata, so it is slightly larger than a standard PDF. PDF/A works together with searchable text (OCR), so you can produce a searchable archival PDF in one export.
- Include project file with export (off by default). When enabled, each export also saves a copy of the project file (
.scproj) next to the exported PDF. A Save dialog appears for it, just like the export, pre-filled with the project name in the same folder. The project's settings then travel with the export, so you can reopen the project later (see Opening a project file).
Use "Reset to Defaults" to restore the reference values. These settings are not per-project; they apply to all exports.
Uniform page size is also available per page. When it is on, the Page Overrides section shows an "Exclude this page from uniform size" option, so a single page (for example a large fold-out) can export at its own size without enlarging the shared page size for the rest of the document.
Opening a project file
A project file (.scproj) stores your crops, layout, and other settings. You can produce one next to an export with Include project file with export (see above), which makes a project portable: move the PDF and its project file together to another folder or Mac.
To reopen a project, open the .scproj file the same way you open a PDF: double-click it in Finder, drag it onto the app, or use File > Open. DeskewPro reads the project, then asks once for access to the folder that holds its source files. It finds the right files by their content, so it still works even if they have been renamed. After you grant access once, reopening that project does not ask again. Opening a PDF or image directly is unchanged.
Uniform Page Size
When enabled (default), all exported pages are the same size, determined by the largest crop region. Smaller crops sit on a colored background. Disable to let each page have its own size based on its crop region.
With Uniform Page Size on, a gear button appears next to the toggle. It opens the Uniform Page Layout dialog, where you can configure:
- Background color. The fill color used around smaller pages. White by default.
- Anchor. A 3 by 3 grid that sets where each smaller page sits on the canvas: center, an edge, or a corner. The page is flush with the chosen side, and the rest is filled with the background color.
- Left / Right vs Inner / Outer. In Left/Right mode the anchor applies the same way to every page. In Inner/Outer mode the anchor is mirrored across the spine, so two facing pages anchored to the inner edge touch at the spine with no gap. This is what you want for magazine or book spreads viewed two pages at a time. The dialog shows two mirrored grids, one for each side of the spread, and a setting for which side even pages sit on.
- Cover and back. Optional toggles to anchor the first page (cover) and last page (back) on their own, independent of the main pattern.
The preview panel updates live as you change these settings, so you can see the result before exporting.
Black and White Export
To export pages as crisp black and white for archival or OCR pipelines, use the "Binarize" control in Document Defaults or per page. See Binarization for the full reference. It combines with searchable text and PDF/A in a single export.
Undo and Redo
Cmd+Z undoes the last action. Cmd+Shift+Z redoes. DeskewPro supports up to 100 levels of undo. All inspector changes, drag operations, and resets are undoable. Undo history is in-memory only and is cleared when a new PDF is opened.
Use Edit > Reset All Settings (Cmd+Shift+R) to reset all crop settings to defaults. Shows a confirmation dialog before proceeding. Can be undone with Cmd+Z.
Keyboard Shortcuts
| Shortcut | Action |
|---|---|
| Cmd+O | Open File |
| Cmd+W | Close Project |
| Cmd+E | Export PDF |
| Cmd+Z | Undo |
| Cmd+Shift+Z | Redo |
| Cmd+Shift+R | Reset All Settings |
| Cmd+, | Settings (Export Quality) |
| Cmd+? | Help (opens this page) |
| Cmd++ | Zoom In |
| Cmd+- | Zoom Out |
| Cmd+0 | Zoom to Fit |
| Left Arrow | Previous page |
| Right Arrow | Next page |
| Delete | Remove selected page |
Troubleshooting
Getting Help and Sending Feedback
Found a bug, have an idea, or need a hand? Choose Help → Send Feedback in the app, or visit the support page. Bug reports, feature ideas, and questions go straight to our team. Leaving your email is optional and is only used to reply to you.
Debug Log
DeskewPro writes a debug log to ~/Library/Application Support/DeskewPro/debug.log. The log rotates at 512KB. Check this file if you experience unexpected behavior.
Project File Location
Project files are stored in ~/Library/Application Support/DeskewPro/projects/. Each project contains all crop settings and page references. Opening the same PDF again restores the existing project.
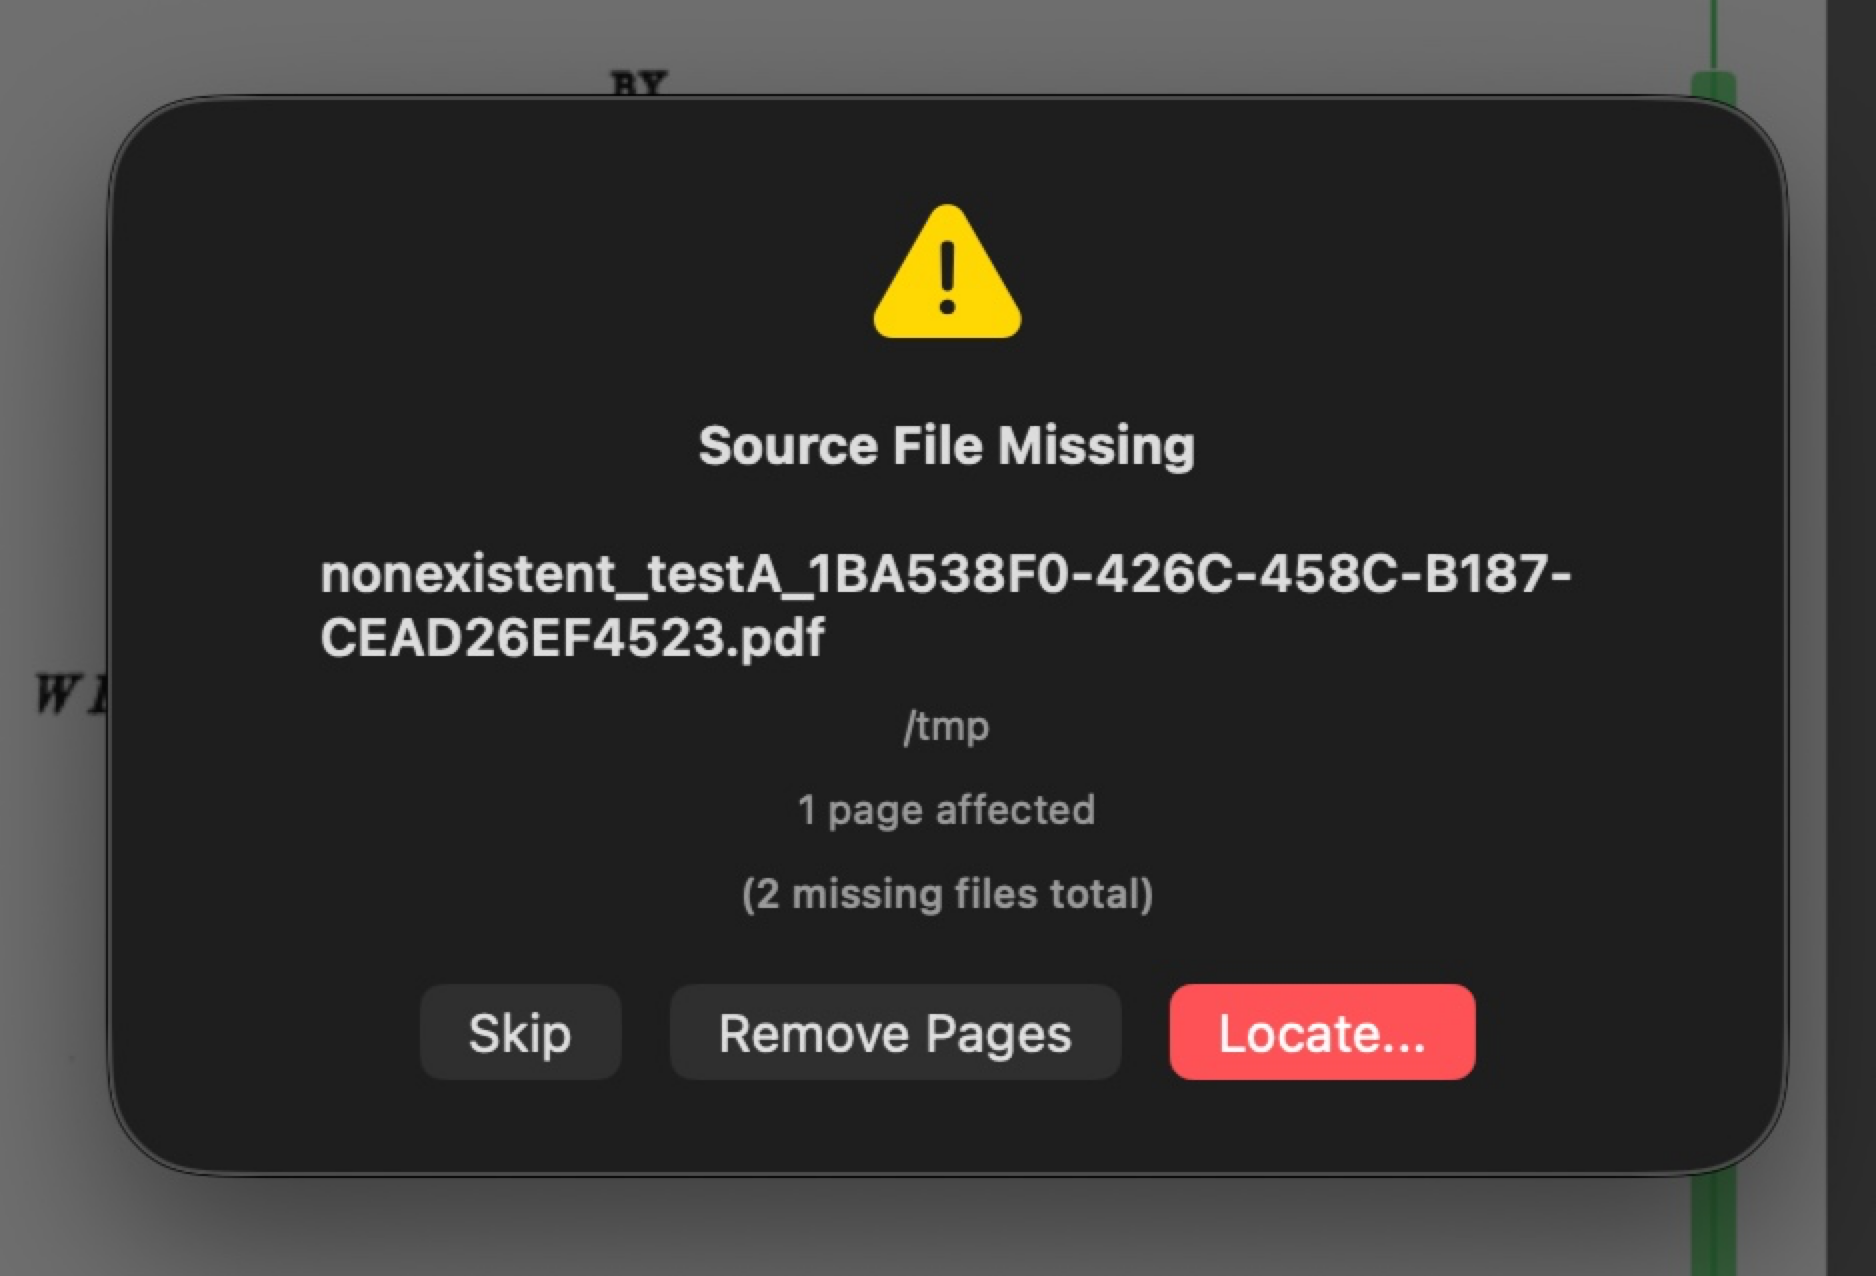
Missing Source Files
When a project is opened or export starts, DeskewPro checks that all referenced source PDFs still exist. If any files have been moved, renamed, or deleted, a dialog appears with options for each missing file:
- Locate...: browse for the file at its new location. DeskewPro verifies the content matches the original if a hash is available.
- Remove Pages: removes all pages from the missing source.
- Skip: leaves the affected pages blank. They will be skipped during export. You can relocate them later by clicking "Locate..." on the canvas placeholder.
Acknowledgements
UVDoc
The AI dewarping model uses UVDoc, a neural grid-based document unwarping network (SIGGRAPH Asia 2023) by Tanguy Magne. Licensed under the MIT License.